SONICLEAN PTY LTD ABN 89 057 730 917 ACN 057 730 917 38 Anderson Street, Thebarton, South Australia, 5031 Tel: 61 + 8 + 8234 8398 Fax: 61 + 8 + 8234 8391 www.soniclean.com.au – sales@soniclean.com.
Table of Contents 1. Product Overview....................................................................................................................... 1 1.1 Specification............................................................................................................................ 1 1.2 External Connections.............................................................................................................. 2 1.3 Keypad Description..................................................
7.7 Power up. (P-UP)..................................................................................................................15 7.8 Water Leak. (H2OL).............................................................................................................. 15 7.9 Setting default IP values. (IP-?).............................................................................................15 8. Remote Diagnostic Interface............................................................................
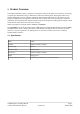
1. Product Overview The Irrigated Ultrasonic Cleaner (“Irrigator”) is designed to improve the quality and consistency of cleaning of laparoscopic instruments using a combination of ultrasonics and irrigation. The Irrigator flushes clean solution through the cannulae of hollow instruments whilst delivering ultrasonics to precision clean. The Irrigator is designed for cleaning hollow instruments and is equally effective for cleaning non-cannulated instruments.
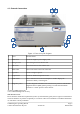
1.2 External Connections 3 4 5 2 6 7 1 8 Figure 1: Front view of the Irrigator # Label Function details 1. Main Power Socket for irrigator's power supply cable. 2. Detergent inlet Allow detergent to flow into the tank. 3. Water inlet Allow fresh water to flow into the tank. 4. Waste outlet Allow waste water to flow out of the tank. 5. To printer* Socket to irrigator's printer. 6. Temperature* Socket for ambient temperature sensor. 7.
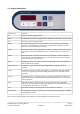
1.3 Keypad Description Name of key Function ▲ Increases values in program mode. Enter Confirms the parameters in program mode. Initialises the machine in operate mode. ▼ Decreases values in program mode. Shift Second function key. To activate the function noted in red below a button hold down the second function key and press the required button. Functions accessed this way are Drain, Refill, Reset and Prog. Drain Drains the machine (takes approximately 2 mins).
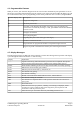
1.4 Programmable Features When you receive your Soniclean Irrigator it will be set to function automatically. The parameters are set in the factory. The features described below may be altered as you require. The list includes the display you will see on the machine when you are programming. To alter these parameters refer to section 6, Program Mode. Parameter display name Descriptions Ct Length of cleaning times PO Ultrasonic power levels Cn Clean time.
The following error conditions are shown on the cleaner's display. Display Drnb FAIL HOT LO OFLO rtc P-UP H2OL IP-? Explanation This indicates sensors detect liquid when wash tank supposed to be empty. For diagnosis this error, refer to section 7.3 Indicates that the operator programmed values have been lost and will need to be reprogrammed. For diagnosis this error, refer to section 7.1 Indicates an excessive heat condition. For diagnosis this error, refer to section 7.
2. Installation Requirements IMPORTANT NOTE: The customer shall ensure the following requirements are met prior to installation. This is essential for the machine to perform optimally and to fulfil applicable standards. 2.1 Environmental: • Use water with ambient temperature. • A tap or inlet must be dedicated to the irrigator. • Clean water (meeting AS/NZS 4187:2003 or equivalent) must be used for cleaning surgical instruments. • A drain outlet must be dedicated to the irrigator. 2.
3. Installation Procedure 3.1 Plumbing: 1. Screw supplied braided hose on to the machine and inlet mains water supply (hand tighten only). 2. Screw and hand tighten supplied grey sink hose onto the machine and insert into drain. 3. Ensure that the drain hose falls evenly away from the machine to the drain 3.2 Electrical: 1. Wall power socket should supply 240 Vac at 50-60 Hz and be rated at 10 amps. 2. Wall power socket lshould be ocated within 600mm from the machine. 3.
2. Plug the printer cable into the machine and the printer 3. Press the feed button to progress the paper. 3.6 Detergent Bottle: 1. Connect detergent hose to left hand side socket of machine. 2. Place filtered end of detergent hose into container. 3. Ensure there is sufficient detergent in bottle at all times. Please note Chemical Type:______________ (Sonic 1) Dosage Setup:_______________ (0.
4. Operating Instructions 4.1 Prior to Operating: Position machine on bench top or table. Ideally the lid of the machine should be at elbow height. Ensure the machine is horizontal and the water inlet tap is turned on. 4.2 How to Operate: 4.2.1 Start Process: 1. Turn on at power point. 2. Switch on ON/OFF switch. 3. The machine will display 8.8.8.8, then SC.X.X 4. The machine will automatically drain, flush, drain the flush, fill with water and detergent and perform a de-gassing cycle. 5.
4.2.3 Load the Machine: Refer to Appendix A (“Cleaning Cannulated Instruments”) for suggestions about the care of your laparoscopic instruments. 1. Instruments may be loaded into tray with the tray located in the Irrigator tank, inside the machine, or resting above the bath. (Use the “T” handle on the tray to position tray above bath) 2. Dismantle the instruments and insert the nozzle end of the cannulated instrument (standard sizes 2, 5 and 10mm) into the connector provided. 3.
2. Lift the lid. 3. Raise the instrument tray and rest it above the bath using the ‘T’ handle. 4.2.8 Automatic Drain and/or Shutdown: The Irrigator can be programmed to automatically drain after a selected number of cleaning cycles. 1. Manufacturer’s programmed number of cleans between draining is ten. 2. When the tenth clean cycle is completed the machine will display “END”. 3. The tank will automatically drain. 4.3 Irrigator Function: 1. To turn on, press the “Irrigate” key.
5. Foil Test Soniclean recommends that the tray be removed from the Irrigator to ensure the foil test is accurate. 5.1 How to perform foil test: 1. Complete the usual start process 2. Use a strip of ‘home’ brand aluminium foil about 150mm long x width of roll. 3. Make sure Lid is closed 4. Press Test Key to switch on ultrasonic and unit will run for 30 sec as programmed 5. Open the Lid and insert the foil vertically into the bath. 6. Keep foil in the bath until LID is displayed 7.
6. Program Mode The parameters can be altered by entering the program mode. There are 3 ways of entry to this mode. 6.1 Program Entry Points: 6.1.1 Alternative 1 – Program at Start Up 1. Press the “PROG” key then turn on the machine. 2. Hold the “PROG” down until the machine displays “CT 10”. 3. Release the “PROG” key. 6.1.2 Alternative 2 - Program during Operation: 1. When the machine will display “- - - -“ 2. Hold down the “SHIFT” key and then press the “PROG” key and hold for 3 seconds. 6.
7. Error Diagnosis 7.1 Program Values Lost: (FAIL) This message indicates the operator programmed values have been lost and will need to be re-entered. This error occurs when the machine loads the programmed values stored in memory and an error is detected in the data. This error may be caused by: 1. The memory device has not been programmed or programming has been erased. 2. An error in the memory device. 3. Electrical “noise” causing corruption of data. Corrective Action 1.
7.4 Overflow Detection: (OFLO) 1. This message occurs when liquid is in danger of overflowing tank. 2. When this condition occur all power to the machine shall be shut down. Corrective Action 1. Turn off the machine 2. Scoop out the water manually from the tank. 3. Turn on the machine, machine will operate again. 4. If the machine is still not working, contact a service agent. 7.5 Ultrasonics Overheating: (HOT) This message occurs when the ultrasonics board indicates an excessive heat condition.
8. Remote Diagnostic Interface All irrigator machines have a diagnostic port at the front of the machine located at the middle of the stainless steel tray at the bottom of the irrigator (refer to section 1.2, External Connection #8: PC-Diagnosis).
Appendix A: Cleaning Cannulated Instruments Cannulated instruments are difficult and time consuming to clean. This information is designed to assist you in the cleaning of your instruments. It provides suggestions only and needs to be used in conjunction with your hospital procedures and protocols, the instrument manufacturers’ instructions and the Australian Standards (AS/NZ). In particular, AS/NZ 4187 and AS/NZ 2773.2. “The aim of cleaning is to remove microbial, organic and inorganic soil.
2. Check for any signs of contamination while rinsing: if present, repeat cleaning process. 3. Dry instrument using compressed air (air gun) if available. If any soil seen, repeat cleaning process. 4. Pre-pack and sterilise as per usual procedure. A.4 Performance Testing A.4.1 Foil Test As per AS/NZ 2773.2 it is recommended that you undertake a performance test on your Irrigator regularly. Your machine has been supplied with a sample foil test to assist you with this testing. A.4.
Appendix B: S-2800 Ultrasonic Irrigator Instructions SUMMARY OPERATING INSTRUCTIONS • Remove tray. Turn on at power point. Machine will display 8.8.8.8, then SC4.1. Machine will automatically drain, flush, drain the flush, fill, & degas (approx. 2+3+20=25 minutes) • Machine will display - - - - • Check program settings. • The machine is now ready for use. • Load the machine and Close the lid. • Press CLEAN. Display shows C-01 (number of cleans), degas, 01.
Appendix C: Recommended S2800/S2800MRS preventative protocol Soniclean recommended the following protocol to be carried out (daily and weekly by your authorities; annually by your service agent) to ensure the machine is performing at the optimum performance. DAILY Remove and clean strainer Ensure strainer is clean. Drain machine at end of day/session Ensure the contaminated water is not stored in tank Check cleaning efficacy Visual examination of all load items.
Appendix D: Recommended S-2800/S-2800MRS disinfection protocol It is Soniclean’s protocol to disinfect every irrigator supplied for trial at the end of every trial and immediately prior to commencing the next trial. Soniclean or their distributors/agents will ensure this is undertaken unless the trial organisation prefers to conduct the disinfection themselves. The protocol to be followed: 1. Drain irrigator and turn off at power point. 2.
irrigator it is recommended that you dilute LCC, 1:35. That is: 1. To disinfect surfaces you will need to add 6mls of disinfectant to 200mls of water and then use this solution to wipe the surfaces with. 2. To disinfect internal plumbing fittings, set the soap % parameter to 5. (This will ensure 800mls of LCC is added to the 30 litre tank).
Appendix E: Irrigator Warranty For goods purchased in Australia after 1 January 2012: Soniclean goods come with guarantees that cannot be excluded under the Australian Consumer Law. You are entitled to a replacement or refund for a major failure and for compensation for any other reasonably foreseeable loss or damage. You are also entitled to have the goods repaired or replaced if the goods fail to be of acceptable quality and the failure does not amount to a major failure.
Appendix F: Installation Check-list for 2800/2800MRS Irrigator NOTE: The check-list must be returned to Soniclean (the manufacturer) together with the warranty form from date of commissioning the machine.
F.1 For Technician: Please tick relevant boxes. If an item is not applicable write “N/A”. Plumbing: i) Screw supplied braided hose on to the machine and inlet mains water supply (hand tighten only). ii) Screw and hand tighten supplied grey sink hose onto the machine and insert into drain. iii) Ensure that the drain hose falls evenly away from the machine to the drain Electrical: i) Wall power socket 240 VAC 50-60 Hz rated at 10 amps. ii) Wall power socket located within 600mm from the machine.
F.2 S2800 Customer Installation Requirements IMPORTANT NOTE: The customer shall ensure the following requirements are met prior to installation. This is essential for the machine to perform at optimum level and to fulfil Australian Standards. Environmental: i) ii) iii) iv) Use water with ambient temperature A tap or inlet must be dedicated to the irrigator. Clean water (meet AS/NZS 4187:2003) must be used for cleaning surgical instruments. A drain outlet must be dedicated to the irrigator.