
Clock Radio User Manual
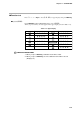
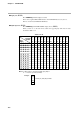
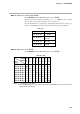
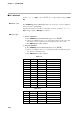
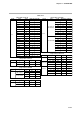
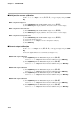
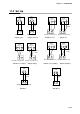
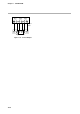

Table Of Contents
- CP-UM-5093E-04.pdf
- SAFETY PRECAUTIONS
- Contents
- Chapter 1. GENERAL
- Chapter 2. NAMES & FUNCTIONS OF PARTS
- Chapter 3. MOUNTING
- Chapter 4. WIRING
- 4-1 Wiring Precautions
- 4-2 Compensating Lead
- 4-3 Terminal Connections
- 4-4 Layout of Terminals and Recommended Lead Draw-out Direction
- 4-5 Connecting the Ground and Power Supply
- 4-6 Wiring of Standard and Add-on Terminal Base
- 4-7 Connecting Inputs (analog inputs)
- 4-8 Connecting control outputs (outputs 1, 2)
- 4-9 Connecting auxiliary outputs (outputs 2, 3)
- 4-10 Connecting Event Output (relay output)
- 4-11 Connecting Time Event Output (open-collector)
- 4-12 Connecting External Switch (RSW) Input
- 4-13 Connecting for Communications
- 4-14 Isolating Inputs and Outputs
- Chapter 5. FUNCTIONS
- Chapter 6. OPERATION
- Chapter 7. PARAMETER SETUP
- Chapter 8. PROGRAM SETUP
- Chapter 9. TROUBLESHOOTING
- Chapter 10. SPECIFICATIONS
- Chapter 11. CALIBRATION
- Index

■ Cold junction sensor calibration
Scroll ↑, ↓, ←, or → keys to show (
2.0.2.2.
) on upper display, then press ENT
key.
●The cold junction input 0%
(1) Press SETUP key until the PROG/SEG display shows (
02-01
).
(2) Press ENT key after display stabilizes, AD count is shown on lower display.
●The cold junction AD count data
(1) Press SETUP key until the PROG/SEG display shows (
02-02
).
(2) Press ENT key after display stabilizes, AD count is shown on lower display.
●The cold junction temperature data
(1) Press SETUP key until the PROG/SEG display shows (
02-03
).
(2) Connect the thermometer (55).
(3) Scroll ↑, ↓, ←, or → keys to set above temperature value(°C).
(4) Press ENT key.
■ Current output calibration
Scroll ↑, ↓, ←, or → keys to show (
4.0.4.4.
) on the upper display, then press ENT
key.
Connect the digital ammeter across terminals (See Figure 11-9).
●OUT CH1 output calibration
(1) Press PARA key until the PROG/SEG display shows (
04-01
).
Scroll ↑, ↓, ←, or → keys until meter indicates 4.00mA, then press ENT key.
(2) Press PARA key until the PROG/SEG display shows (
04-02
).
Scroll ↑, ↓, ←, or → keys until meter indicates 20.00mA, then press ENT key.
●OUT CH2 output calibration
(1) Press PARA key until the PROG/SEG display shows (
06-03
).
Scroll ↑, ↓, ←, or → keys until meter indicates 4.00mA, then press ENT key.
(2) Press PARA key until the PROG/SEG display shows (
06-04
).
Scroll ↑, ↓, ←, or → keys until meter indicates 20.00mA, then press ENT key.
●OUT CH1 output calibration
(1) Press PARA key until the PROG/SEG display shows (
04-05
).
Scroll ↑, ↓, ←, or → keys until meter indicates 4.00mA, then press ENT key.
(2) Press PARA key until the PROG/SEG display shows (
04-06
).
Scroll ↑, ↓, ←, or → keys until meter indicates 20.00mA, then press ENT key.
11-12
Chapter 11. CALIBRATION