
User's Manual


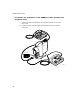

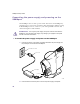

Table Of Contents
- Important safety instructions
- Regulatory Notices
- Contents
- Introduction
- Installing the SOMAport
- An overview of the installation
- Unpacking the SOMAport
- Choosing the best location for the SOMAport
- Connecting a computer via Ethernet
- Connecting a computer via USB
- Connecting multiple computers to the SOMAport
- Connecting telephones to the SOMAport
- Connecting the power supply and powering on the SOMAport
- Testing your equipment
- Configuring network settings for Ethernet connections
- Activating full service
- SOMAport Lights
- Troubleshooting and Getting Help
- Index

39
Installing the SOMAport
Configuring network settings for Ethernet
connections
Change your computer’s network settings if you could not get an Internet
connection after connecting your computer to the SOMAport. Several
procedures follow. Choose the one that is appropriate for your operating system.
If you are using Windows, you can use the Internet Connection Wizard.
To change network settings in Windows
1
Start the Internet Connection Wizard.
2
Do the following to complete the wizard.
3
Restart your computer.
NOTE:
Do not skip this step.
IF you have ... THEN choose ...
Windows 95 Start→Programs→Accessories→Internet Tools→Get on the Internet
Windows 98/2000/ME Start→Programs→Accessories→Communications→Internet
Connection Wizard
Windows XP Start→All Programs→Accessories→Communications→New
Connection Wizard
IF you have ... THEN ...
Windows 95/98/ME/2000
1 Choose I want to set up my Internet connection manually,
or I want to connect through a local area network (LAN).
2 Choose I connect through a local area network.
3 Leave all checkboxes on the Local area network Internet
configuration window blank.
4 Choose No when prompted to set up an Internet Mail
Account.
5 Click Finish.
Windows XP
1 Choose Connect to the Internet.
2 Choose Set up my connection manually.
3 Choose Connect using a broadband connection that is
always on.
4 Click Finish.