
User's Manual


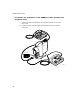

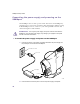

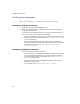
Table Of Contents
- Important safety instructions
- Regulatory Notices
- Contents
- Introduction
- Installing the SOMAport
- An overview of the installation
- Unpacking the SOMAport
- Choosing the best location for the SOMAport
- Connecting a computer via Ethernet
- Connecting a computer via USB
- Connecting multiple computers to the SOMAport
- Connecting telephones to the SOMAport
- Connecting the power supply and powering on the SOMAport
- Testing your equipment
- Configuring network settings for Ethernet connections
- Activating full service
- SOMAport Lights
- Troubleshooting and Getting Help
- Index
37
Installing the SOMAport
3
Position and orient the SOMAport in the location in which you plan on
keeping it.
NOTE:
The SOMAport acquires a radio signal that is optimized for its
location when you plug it in. If you move the SOMAport when it is on, the signal
may no longer be optimized.
If, once the SOMAport has been installed, you decide to move it, unplug it first,
move it to the new location, and then plug it in to ensure the signal is optimized
for the new location.
4
Insert the plug end of the power cord into a three-prong grounded power outlet.
The SOMAport takes up to five minutes to start, train itself to channel conditions,
and connect to the network.
The Status light on the front panel is solid amber while performing a self-test.
When the test has passed, it flashes amber.
NOTE:
If you need to disconnect the power supply, disconnect the power
cord from the power outlet first. Then unplug the connector from the back of
the SOMAport.
What’s next
When the Status light on the front panel turns green, you are ready to test the
equipment connected to the SOMAport. See “Testing your equipment” on page
38.