
User Manual

December 16, 2002 Part 003609A revision 01 113
Chapter 4: Installation Procedures
To install the main and diversity antennas
1 Verify that you have the right type of antennas, both in terms of frequency and
direction.
2 Run the antenna cable from the NPM racks to the intended location of each
antenna. See your E1 package and installation MOP for antenna cable specifics.
NOTE: Ensure that the cable remains clear of any sources of
potential interference, such as transmitting equipment or power
lines.
3 Attach each antenna to your tower or building using the required mounting
hardware.
4 Orient each antenna to the correct azimuth (direction) and tilt. See your E1
package to determine the antenna’s correct orientation.
5 Tighten and secure each antenna.
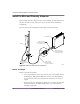
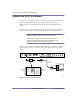
6 Connect the antenna to the RFSS module:
i Install each TMA within 3 m (10 feet) of its antenna. The TMAs should be
installed as close to the antennas as possible in order to ensure optimal
NPM performance. Consult the documentation that ships with the TMA
for the correct mounting procedures.
ii Connect the ANT port on each TMA to its antenna using a suitable
coaxial cable. Torque each 7/16 DIN connector to 17 foot-pounds and
ensure each connector is properly weatherproofed.
iii Install each bias tee (also called a CIN) inside or outside the basestation
building, as specified in your E1 package. Connect the ANT port on each
bias tee to the BTS port on each TMA. Torque each 7/16 DIN connector
!
CAUTION: Failure to orient the antennas according to the
specifications listed in the installation MOP may seriously affect the
performance of your wireless network.
!
CAUTION: Do not over-tighten connectors. Overtightening the
connectors may damage the cable and degrade the RF signal.