
User Manual


74 Part 003609A revision 01 December 16, 2002
Amosphere NPM Installation Procedures (WCS)
Attach the Radio Shelves to the Radio Rack
Depending on the configuration of your NPM, there may be one, two, or three
radio shelves that need to be installed. The radio shelves are installed in the
bottom three bays in the radio rack. If your NPM uses fewer than three radio
shelves, you need to add dummy shelves to the empty bays to ensure the required
airflow to the occupied bays.
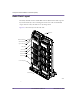
To attach the radio shelves to the radio rack
1 Remove the radio shelf from its protective bag.
NOTE: Each shelf weighs approximately 6.3 kg (14 pounds)
before it is filled with cards.
You can distinguish the radio shelves from the utility shelf by
reading the manufacturer’s label on the chassis.
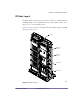
2 Slide the radio shelf into the lowest available radio shelf bay in the radio rack.
If the bay is too tight to accommodate the radio shelf, loosen the 5/16-inch screws
that hold the cable troughs to the rack. This should provide enough space for you
to slide in the radio shelf.
If any of the cable brackets interfere with the insertion of the radio shelf, remove
them. The cable brackets attach to the rack using 5/16-inch screws.
3 Puncture a hole in the grounding tape for each radio shelf screw location.
4 Secure the radio shelf to the rack using eight 5/16-inch screws. Torque each
screw to 50 inch-pounds.
5 Reattach any cable brackets you removed.
6 Retighten the 5/16-inch screws on any loosened cable troughs.
7 Repeat steps 1 to 6 for the remaining radio shelves.
WARNING: Your NPM may arrive with the utility and radio shelves
already populated with cards. If this is the case, ensure that you are properly
grounded before handling the shelves. Failure to do so may damage the
cards.