
User Manual


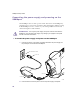
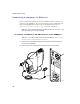

Table Of Contents
- Introduction
- Installing the SOMAport
- Installing the SOMAport and Connecting Equipment
- An overview of the installation
- Unpacking the SOMAport
- Choosing the best location for the SOMAport
- Connecting the power supply and powering on the SOMAport
- Connecting a computer via Ethernet
- Connecting a computer via USB
- Connecting multiple computers to the SOMAport
- Connecting telephones to the SOMAport
- Activating service
- Changing Ethernet Network Settings
- Installing the SOMAport and Connecting Equipment
- SOMAport Lights
- Troubleshooting and Getting Help
- Index

26
SOMAport Setup Guide
Connecting the power supply and powering on the
SOMAport
The SOMAport does not have a power switch. You turn on the SOMAport by
plugging it into a power outlet, and turn it off by unplugging it. When you plug
in the SOMAport, it starts, connects to your service provider’s network, and
tunes itself (acquires a radio channel).
To install the power supply and power on the SOMAport
1
Insert the connector on the power cord that is attached to the power supply into
the power jack on the back of the SOMAport.
2
Insert the socket end of the power cord into the power supply’s receptacle.
WARNING:
Use only the power supply and power cord that came with the
SOMAport. Using another power supply may damage your equipment and poses
the risk of shock or electrocution.
Power Jack
00084
Grounded Power Outlet
Power Supply
Power Cord
Power Light