Portview User Manual Ver 2.1a Mar. 05.
Portview Contents Revision History Revision Date Doc Version Pages Description 10/17/2007 1.0 All Written by khheo 5/12/2012 1.1 Partial Added by khlee 6/28/2012 2.1 All Rewritten by khlee 3/5/2013 2.1a Partial Modified by wlee Copyright 2007-2013 SystemBase Co., Ltd. All rights reserved. Internet Homepage http://www.sysbas.com/ Tel 82-2-855-0501 FAX 82-2-855-0580 16F Daerung Post Tower-1, Guro-dong, Seoul, Korea For any inquiries or comments, contact tech@sysbas.
Portview Contents Contents Chapter 1. Overview ............................................................................................ 1-1 1.1 Features .................................................................................................................. 1-1 1.2 Software .................................................................................................................. 1-1 1.3 Environment ...............................................................................
Portview 4.2 Contents Other functions ........................................................................................................ 4-6 4.2.1 Config ........................................................................................................................4-6 4.2.2 Help ...........................................................................................................................4-6 4.2.3 About ......................................................................
PortView Chapter 1. Overview Chapter 1. Overview PortView is a Windows application supporting real-time monitoring and configuration from the remote site. It can be applied to device server products distributed by SystemBase Co., Ltd. 1.1 Features PortView supports following features from the remote site. Search Real-time data monitoring Real-time device status check Group setup and management Direct Web, Telnet connections 1.
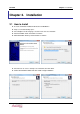
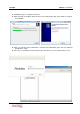
PortView Chapter 2. Installation Chapter 2. Installation 2.1 How to Install Insert the SerialGate installation CD into the CD-ROM drive. Setup screen automatically opens. Select English from the language selection menu and select PortView. PortView installer starts. Click ‘Next’ to continue. Select destination directory and click ‘Next’ to continue. Check the box to create a desktop icon of PortView, and click ‘Next’.
PortView Chapter 2. Installation Installation progress is displayed on the bar. When the setup is complete, check the box to run PortView right away. Click ‘Finish’ to complete the installation. When you checked ‘Run PortView.exe’, PortView will automatically open and the password prompt will be shown. Since there is no initial password predefined, just click OK to access the main PortView screen.
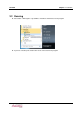
PortView Chapter 2. Installation 2.2 Running Select Start -> All Programs->SystemBase->PortView->PortView to run the program. If you have a desktop icon, double-click on the icon to launch the program.
PortView Chapter 3. PortView and Detector Chapter 3. PortView 3.1 Search Search is a component in Portview, detecting all device servers on the local network and enabling IP, subnet mask, and gateway configuration for these devices. with PortView remote device servers can be managed from one location as well. 3.2 PortView PortView supports efficient features required in managing device servers.
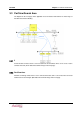
PortView Chapter 3. PortView and Detector 3.3 PortView/Search Area The diagram on the next page shows applicable areas for Detector and Portview. It shows range of detection and remote monitoring. 3.3.1 Search Area Search function can detect device servers located in the local network; device servers across routers cannot be detected. (Green-dotted area from the image on the next page) 3.3.
PortView Chapter 3. PortView and Detector 3.4 User Interface There are three windows in the main screen interface. Main Bar Group Window Device Window 3.4.1 Main Bar Features This window contains PortView management menu, displayed in red. More about this menu is described in Chapter 4. Search: Detect device servers on the local network. Configuration: Configure Alarm, Log, Service Socket, and Password settings. Help: PortView manual folder is open. About: Program version is displayed.
PortView Chapter 3. PortView and Detector 3.4.2 Group Window Features This window contains group, sub-group, device servers, and undefined devices, displayed in blue. More about this menu is described in Chapter 5. Group: It is a top-level category of devices. Users can freely create or remove groups. Ex) “default” group: All device servers belong to this group before specific group is assigned. Sub-group: It can only be created within a specific group, and includes actual device list.
PortView Chapter 4. Main menu Chapter 4. Main Menu This window contains PortView management menu. 4.1 Search function Search function looks for all devices manageable by PortView from the current Local Area Network. Main menu (Tool>Search) provide same function. 4.1.1 Menu of the search function Search: look for devices in the local area. IP Configure: Set temporary IP address to the selected device. Connect Web: Make a Web connection to the selected device.
PortView Chapter 4. Main menu 4.1.2 Search Button Find all device servers from the current Local Area Network. 4.1.3 Search by IP Button This function can find the device using the IP.
PortView Chapter 4. Main menu 4.1.4 Web Connection Web browser opens and connects to the selected IP address. 4.1.5 Telnet Connection Telnet connection is attempted with the selected IP address. 4.1.6 IP Configure & Portview You can modify the IP and enable the portview function via grid. After editing, Click the “Apply” A temporary IP can be assigned here. As stated before, permanent changes need to be made through either Telnet or Web.
PortView Chapter 4. Main menu 4.1.7 Portview Connection There is two methods for enable the function of portview. One is using the Search windows. The other is setup via web. Search windows provides multi configuration for setup the portview function. After connecting to the device server via Web, enter “serialgate” as username and “99999999” as password. Then click ‘Login’ button. Eddy’s default username is “eddy” and the password is “99999999”.
PortView Chapter 4. Main menu Navigate to Network Settings -> Management, and Click “Apply” after setting IP address and port number.
PortView Chapter 4. Main menu 4.2 Other functions There is button of the configuration, button of the help, button of the about and button for adjust the child’s windows. 4.2.1 Config Various configurations for PortView application can be made from this menu. Default setting should satisfy most users. Main menu (Tool>Configuration) provide same function. Alarm: Choose when to invoke an alarm event. Sound can be registered as well. Log: This option sets what kind of event is logged.
PortView Chapter 4. Main menu 4.2.3 About You can see the about windows. There is information of the portview. Main menu(About>About) provide same function. 4.2.4 Cascade Style Display Device Windows in Cascade style. Main menu(View>Cascade) provide same function.
PortView Chapter 4. Main menu 4.2.5 Tile Style Display Device Windows in Cascade style. Main menu(View>Tile) provide same function. 4.2.6 Close All All Device Windows are closed. Main menu(View>Close All) provide same function.
PortView Chapter 5. Group Window Chapter 5. Group Window Group window supports group and sub-group addition and removal, device assignment, and rename features. 5.1 Definitions 5.1.1 Group? There are default (unnamed) and defined (named) groups. Undefined group is the default device management group. Description of the Icon. Icon Description It means the Group. It means the Sub Group. It means that device is connected. It means that device is disconnected.
PortView Chapter 5. Group Window 5.1.2 Sub-Group / Device List? Sub-group: Sub-groups belong to groups. They are the smallest unit of groups that contain individual devices. Device List: This refers to all devices within one sub-group. When you click the sub-group, you will see management screen on the right for the current sub-group. 5.2 Add / Delete Group This section describes how groups can be added, removed, and assigned devices. 5.2.
PortView Chapter 5. Group Window 5.2.2 Add Group Click ‘Add Group’ to create groups. Enter the group name and click OK. Now select ‘Add Sub-Group’ to add a sub-group in the group just created. Enter the sub-group name and click OK.
PortView Chapter 5. Group Window Group is created. Now select the device and drag-and-drop to the destination sub-group. Now the device is moved to the sub-group. Select ‘Rename’ to change the name. Assign a new name. Please note that this name only applies to PortView. Now group and sub-group creation, device assignment rename should be easy.
PortView Chapter 5. Group Window 5.2.3 Delete Group The whole group as well as each sub-group can be removed. Devices in deleted groups appear on the “Undefined” group after a short while.
PortView Chapter 6. Device Window Chapter 6. Device Window Device window shows device list, and is located on the right side of PortView user interface. The following example shows this window in red part. This window mainly handles device information check, status check, and data I/O scope; it is responsible for device monitoring, the main feature of PortView. Description of the Icon. Icon Description It means that device is connected. It means that device is disconnected.
PortView Chapter 6. Device Window 6.1 Sub-Group Window Sub-group window manages devices assigned to each sub-group. Sub-group menu Statistic: Show statistics for the current device.(6.2 describes this feature in details) Configuration: Display configuration details for each device. Web: Open web browser and web configuration interface of the device. Telnet: Make a Telnet connection to the device. Reboot: Reset the device. Status bar: No additional detail is necessary.
PortView Chapter 6. Device Window 6.1.1 Configuration This option displays configuration details for each device. Red part shows device-specific information, while blue part is about ports in the device. Refresh: Refresh all information and update information. 6.1.2 Web/Telnet/Reset/Statistic Refer to the previous coverage on Web/Telnet/Reset. Statistic is described in 6.2.
PortView Chapter 6. Device Window 6.2 Using Statistics Click Statistic button from the sub-group menu to start statistics feature. This supports monitoring and reset for each device. Statistic menu Clear All: Clear all displayed data from the current screen. i.e) Rx/Tx Bytes Clear Port: Each port can be cleared. Scope: One scope window can be opened for each PortView application, and data I/O monitoring is supported independent to PortView. (6.
PortView Chapter 6. Device Window 6.3 Using Scope Scope enables data I/O monitoring in both Hex and ASCII mode. Select the port and click ‘Scope’ to open the scope window. 6.3.1 Scope Menu Start/Stop: Start or stop scope action. Hex/ASCII: Select the data display type. Hex means hexadecimal format, while ASCII means ASCII code. Clear: Clear all output data displayed so far. Capture: Output data can be captured. Saving data is also possible. Screen: Background color and font can be changed.
PortView Chapter 6. Device Window 6.3.2 Start/Stop Once started, hex data is displayed in real-time. Note that Stop button is activated. Click the button to stop. 6.3.3 Hex/ASCII Red-part is displayed in Hex, the other is ASCII. 6.3.4 Capture start/Stop Output data can be saved in text file format once you start and stop capture.
PortView Chapter 6. Device Window 6.3.5 Screen Screen colors and font can be customized. New settings are applied after changing color and font, saving, and closing. 6.4 Exit the program. You can use the windows close button. Main menu(File>Exit) provide same function.
PortView Chapter 7. Uninstalling PortView Chapter 7. Uninstalling PortView On Windows, select Start -> All Programs -> SystemBase -> PortView -> Uninstall PortView. Click ‘Yes’ to proceed removal of PortView. Uninstall progress Message appearing after uninstall is complete.