CS-CAN English Manual 2013.03.20 Version 1.
History Version History Date Version Pages Description 03/20/2013 1.0 All First release Copyright 2013 SystemBase Co., Ltd. All rights reserved. Homepage: http://www.sysbas.com/ Technical Support: http://www.solvline.com/ Tel.: +82-2-855-0501 Fax: +82-2-855-0580 16F Daerung Post Tower-1, 212-8, Guro-dong, Seoul, Republic of Korea Please contact us at tech@sysbas.com if you have any questions.
Index Index About CS-CAN ............................................................................................................. 5 1. Hardware .................................................................................................................. 6 1.1 CS-CAN Pin Map ............................................................................................................. 6 1.2 How to connect CS-CAN with a CAN device ...................................................................
About CS-CAN About CS-CAN CS-CAN is a converter which turns RS232 signal to CAN Message. CAN stands for Controller Area Network. CAN bus was developed in 1986. When CAN was first developed, it was used for communication among electronic devices inside of a car. However, the use was expanded to different areas that it is also used in industrial automated devices or for the medical devices. The advantage of using CS-CAN is as follows: Supports CAN specification 2.
Hardware 1. Hardware 1.
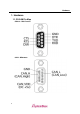
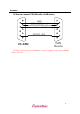
Hardware 1.2 How to connect CS-CAN with a CAN device 1 6 2 7 GND CAN_L(CAN_Low) CAN_H(CAN_High) 3 1 6 2 7 3 8 8 4 9 5 CS-CAN VCC(DC +5V) 4 9 5 CAN Device ※ CS-CAN receives its power from CAN BUS. In order to supply the power, VCC and GND must be connected. 4.
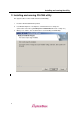
Installing and running the utility 2. Installing and running CS-CAN utility This page describes how to install and run CS-CAN Utility. 1. Insert the CD included with the product. 2. Use Windows Explorer or Computer to run CS-CAN v1.0.0.1 Setup.exe. (The location of the file is: [CD-ROM]:\TEST PROGRAM\CAN v1.0.0.1 Setup.exe) 3. 8 When you as follows, click “Install” button to start installing CS-CAN utility.
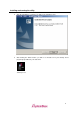
Installing and running the utility 4. After the installation is complete, you will see the following screen. 5. After clicking the “Finish” button, you will see a shortcut icon in your desktop and a program group added to your start menu. 4.
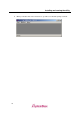
Installing and running the utility 6. 10 When you double click on the shortcut icon, you will see a window opening as follows.
Features in CS-CAN utility 3. Features in CS-CAN utility This page describes about the features in CS-CAN utility. 3.1. Top menu bar The top menu bar appears as follows. Feature of the top menu bar is as follows. Title Port Submenu Description Open Opens serial port window Close Closes serial port window Exit Exit CS-CAN utility Cascade Cascade windows Tile Tile windows Window Close Terminal Close all Windows Shortcut Help About Close all terminal windows Close all windows.
Features in CS-CAN utility 3.2. Port open dialog box Click on the “Port” from the submenu and click “Open” to see the Open Port dialog box shown as below. Description for each entries are as follows. Title Submenu Description Starting port Ports will open consecutively from the selected port number. Number of Number of ports will be opened consecutively depending on ports the selected number.
Features in CS-CAN utility 3.3. Port window Port window is shown as below. Light grey background indicates, it is in Read Only attribute. White background indicates that the value can be modified. Dark grey indicates that CS-CAN cannot be detected from the COM port. The descriptions for the buttons on the top part of Port window are as follows.
Features in CS-CAN utility The descriptions for the top part of the columns in the Port windows are as follows. Column Port Description Port number Current status Status - N/A : Cannot detect CS-CAN - Config : CS-CAN is in Configuration mode - Active : CS-CAN is in Active mode - Search : Looking for the connected information with the CS-CAN FW Ver.
Features in CS-CAN utility 3.5. Config dialog box If you click on the ’Config’ button, Connection Setting dialog box will appear. Use with caution. It will set all the configurations to the every ports related to CS-CAN. 4.
Features in CS-CAN utility Descriptions for each fields are as follows. Type Control Description Set Baud rate in CS-CAN Baud rate (1200, 2400, 3600, 4800, 9600, 14400, 19200, 38400, 57600, 115200) bps Set Data bits in CS-CAN RS232 Data bits (Commands are in ASCII format, therefore only 8bits are supported) Stop bits Parity bits Baud rate Spec. Set Stop bits in CS-CAN (1bit, 2bits) Set Parity bits in CS-CAN (None, Odd, Even, Mark, Space) Set Baud rate in CS-CAN (83000,.
Firmware Upload dialog box 3.6. Firmware Upload dialog box Click on the ‘F/W Upgrade’ control and Firmware Upload windows will appear. Description for it is as follows. Description for each entries are as follows Control Description File Path Display absolute path for hex file. File Load Display dialog box to find the hex file. Progress Display current status. Firmware Upgrade Cancel Start firmware uploading. Cancel firmware uploading. 4.
Firmware Upload dialog box - How to upload a firmware. 1. Click on the File Load button to see a window shown as below.
Firmware Upload dialog box 2. Select CS-CAN.hex that you downloaded from our website and choose a file then click on “open” button. 3. When you click “Firmware Upgrade” button, firmware upload will start and display current progress. 4. When the firmware is successfully uploaded, you will see a message shown as below. 5. For optimized operation, reboot your CS-CAN Utility and CS-CAN. 4.
Firmware Upload dialog box 3.7. Shortcut dialog box This page describes about shortcut keys in CS-CAN utility. Click ‘Help’ from the top menu상단 and click on ‘Shortcut’ to see the dialog box shown as following. With these shortcut keys, it is very convenient and fast while using this utility. You can use this utility without closing the shortcut dialog box.
About 3.8. About dialog box This page describes about the About dialog box. SystemBase logo, utility version, web address for technical support and homepage for SystemBase is shown. If you click on the web addresses, you can visit those sites.. 4.
Auto Detect Feature 3.9. Auto Detect Feature This page describes about the Auto Detect function. Auto Detect function CS-CS-CAN Utility CAN serial communication environment if you do not remember, find the serial communications environment that is a feature. It is recommended that used to take a long time (up to 5 minutes), so if you do not know the serial communication environment. Run the Auto Detect screen. Will find the settings COM 5,6, COM 7,8 are looking for.
Testing 4. How to perform a test This page shows how to test your CS-CAN. You do not have to install additional application or utility to run CS-CAN v1.0. (However, for your convenience, we provide separate utility for you to set and test your CS-CAN v1.0 more easily.) Connect CS-CAN v1.0 to your computer or with communication device and supply power to use it. 1. Connect the RS232 from your CS-CAN to your serial port in your PC. 2. Supply power to CS-CAN. (CAN side: Pin 6 = GND, Pin 9 = +5V) 3.
Testing 5. Port open dialog box will appear. If you want to open consecutive numbers of COM ports, select the starting port number and the number of ports you wish to open then click OK button. (The example below shows a CS-CAN connected to COM 10 and COM 11.) 6. 24 When you click “OK” button, Port window will appear as follows.
Testing 7. When you click “Read Status” button, CS-CAN information will be read from the hardware and displayed. 4.
Testing 8. Click “Send Frame” button to start the test. Following screenshot is an example of running the test.
Uninstallation 5. Uninstallation This page describes about the uninstallation process for CS-CAN utility. 1. You can run Uninstall from the program group in start menu or from Programs and Features (Windows 7), then select CS-CAN v1.0 to Uninstall CS-CAN utility. 2. Select Remove when you see a window shown as following, then click Next button. 3. When you see a message shown as below, Click Yes button to remove CS-CAN from your system. 4.
Uninstallation 4. After uninstallation is complete, shown as below, click “Finish” button to complete the process of uninstallation.
Appendix - Appendix: CS-CAN v1.0 commands This page describes about commands in CS-CAN v1.0 converter. Please refer to Command manual for more information. C : Configuration Mode A : Active Mode Command Description C A VA Display current firmware version ● ● MO Return current CS-CAN mode ● ● RS Retrieve configuration for serial communication in CS-CAN ● ● RC Read CAN Baud rate and Spec. from CS-CAN ● ● +++ Enter Configuration mode ● tlllLDD..