
Instruction Manual

High Quality Groundwater and Surface Water Monitoring Instrumentation
12V Submersible Pump Operating Instructions
(Page 2 of 3)
Troubleshooting
If the Pump or Controller fail to work, please try the following:
• Make sure the Pump is submerged and properly connected
to the Controller.
• Make sure the Controller is properly connected to the power
source (LED lights will remain off with reverse polarity).
• Try resetting the circuit breaker by pushing the button back
into the Controller.
• Make sure the Controller dial is turned all the way up to
position 10 (turned clockwise all the way until it stops).
• Check the LED lights to see if they are indicating high or
low battery voltage.
• Check the battery voltage, it must be 12.5 volts minimum:
The Controller has a low voltage disconnect at 10 volts.
The Controller will shut off and then turn on every few
seconds (pulsate) or the water flow from the Pump will
slow if the output voltage on the battery drops to 10.75
volts when in use. The Controller has a high voltage
disconnect at 18 volts.
• A fast flashing red LED indicates an electrical continuity
issue. Check voltage and all connections.
• Make sure the Pump is operational. The Pump can overload
if the impeller is blocked with sediments.
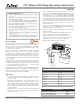
LED Indicator Light Denitions
LED Condition
Cycling colours: Pump OFF
Solid green: Pump ON
Flashing green: Pumping at Maximum Rate
Slow ashing yellow: Charge Battery
Fast ashing yellow: Voltage Too High
Solid red: Stop Pump. Service Required.
Slow ashing red: Controller Cool-down Required
Fast ashing red: Pump is Disconnected
Pump Maintenance
• The Pump can run as long as the motor is submerged
and battery power is available. Running the motor dry will
reduce its life. If Pump runs for very long time then the
motor will not last.
• In the event of a tripped circuit breaker, turn the
Controller dial to the “0” position, then press the reset
button and slowly turn the dial to desired setting.
• Use the optional disposable filter to prevent sediments
from entering the Pump motor.
Decontamination
• To decontaminate the Pump, always follow your local
guidelines and protocols.
• DO NOT fully disassemble the Pump.
1. Unscrew intake or filter from the bottom of the Pump.
2. Wash the Pump with a phosphate-free soap.
3. Rinse thoroughly with deionized water and dry.
4. Reconnect the intake or a new filter.
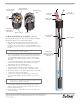
800M Mini Pneumatic Packer Connection
(suitable for 50 mm (2" OD) Schd 40 wells)
1. Unscrew the intake/filter from the bottom of the Pump.
2. Screw the Pump to Packer Adaptor into the bottom of the
Pump until finger tight.
3. Screw the 800M Packer Assembly into the bottom of the
Pump to Packer Adaptor. (See the Model 800M Assembly
and Installation Instructions).
4. Lower the assembly to the desired depth.
5. Inflate the Packer Assembly as described in the 800M
Assembly and Installation Instructions and operate the
12V Pump in the same manner as described on Page 1.
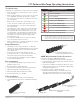
Optional Disposable Filter
( #115774 100 US mesh sieve size)
Pump Intake
Pump to Packer Adaptor
(#115939)
800M Mini Single Packer Assembly
(#115931)
Note: All “Red” faults require the Controller to be turned off, wait 10
seconds, and turn it back on to clear the indicator. Exception: if
the Controller is overheated, then turn the dial to near “0” but
keep the unit powered to let the fan provide airflow for cooling.
Sample Inlet
Filter Installation
1. Unscrew the intake from the bottom of the Pump.
2. Screw the filter into the bottom of the Pump until finger
tight.
Slow: 1 ash per second Fast: 4 ashes per second