
User Manual

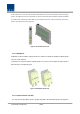


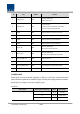


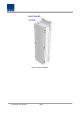
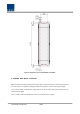
Table Of Contents
- Section1 Safety & Certification Notice
- Section2 System configuration and Functions
- 2.1 HROU (High power Remote Optic Unit)
- 2.1.1 Specifications of HROU
- 2.1.2 Block Diagram of HROU
- 2.1.2.1 HMRU block diagram
- 2.1.2.2 HROU inner look
- 2.1.2.3 HROU part list
- 2.1.3 Function by unit
- 2.1.3.1 High Remote Drive Unit (HRDU)
- 2.1.3.2 Remote Power Supply Unit ( RPSU)
- 2.1.3.3 Remote Optic(ROPTIC)
- 2.1.3.4 Remote Central Processor Unit (RCPU)
- 2.1.3.5 Multiplexer
- 2.1.3.6 System interface unit (SIU)
- 2.1.4 Bottom of HROU
- 2.1.4.1 Functions
- 2.1 HROU (High power Remote Optic Unit)
- Section3 System Installation

Confidential & Proprietary 30/44
Figure 16. Dimension used to install HROU on the WALL
3.1.3 HROU Wall Mount Installation
HROU’s installation bracket is attached on Enclosure when is delivered. It doesn’t need to remove bracket
to install enclosure. simply after installing 4 of M12 mounting bolts, secure 4 mounting bolts tightly.
First, install 2 of M12 mounting bolts roughly half way on the enclosure and install enclosure over the
bolts and secure tightly.
Second, install 2 of M12 mounting bolts under the enclosure and secure tightly.