
Installation Manual


Confidential & Proprietary 42/43
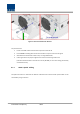
The procedures are
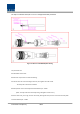
1. Lift the HRDU onto the guide bracket and ensure the MRDU is level left to right
2. Push the HRDU into the corresponding slot in the direction of the heat sink while levelling the
MRDU to guide bracket
3. Make sure the HRDU is firmly inserted into the corresponding slot. Tighten the 4 corner screws
to secure the unit
4. Install HRDU blank cards in all unused slots in the remote. First insert the blank card into the
corresponding slot, then tighten the captive screw to secure it
"The Manufacturer's rated output power of this equipment is for single carrier operation. For
situations when multiple carrier signals are present, the rating would have to be reduced by 3.5
dB, especially where the output signal is re-radiated and can cause interference to adjacent
band users. This power reduction is to be by means of input power or gain reduction and not
by an attenuator at the output of the device."
RSS-GEN, Sec. 7.1.2 – (transmitters)
Under Industry Canada regulations, this radio transmitter may only operate using an antenna
of a type and maximum (or lesser) gain approved for the transmitter by Industry Canada. To
reduce potential radio interference to other users, the antenna type and its gain should be so
chosen that the equivalent isotropically radiated power (e.i.r.p.) is not more than that
necessary for successful communication.
Conformément à la réglementation d’Industrie Canada, le présent émetteur radio peut
fonctionneravec une antenne d’un type et d’un gain maximal (ou inférieur) approuvé pour
l’émetteur par Industrie Canada. Dans le but de réduire les risques de brouillage radioélectrique
à l’intention desautres utilisateurs, il faut choisir le type d’antenne et son gain de sorte que la
puissance isotroperayonnée quivalente (p.i.r.e.) ne dépassepas l’intensité nécessaire à
l’établissement d’une communication satisfaisante.