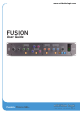
www.solidstatelogic.com FUSION User Guide Fusion. This is SSL.
The Path To Fusion A little over two years ago, we set out to create a new piece of analogue equipment that would enhance any engineer’s studio setup and easily attach to a pair of inputs and outputs on an audio interface or an analogue desk/summing mixer. In true SSL fashion, this piece of equipment would seek to enhance not only the sound of the mix but also the workflow of whatever situation it would be thrust into - a new analogue ‘sidekick’, if you will. Visit SSL at: www.solidstatelogic.
Contents Table of Contents All returns Appendix A - Physical Specification Introduction 1 Features 1 Unpacking 2 Safety Notices 2 Rack Mounting, Heat & Ventilation 2 Hardware Overview 3 Front Panel 3 Rear Panel 3 Signal Flow Overview 4 Setup Examples 5 Connecting Fusion to an Audio Interface 5 Using Fusion as a Hardware Insert 5 Alternative Setup Option 5 Connecting Fusion to an Analogue Desk / Summing Mixer Contents 6 Start Me Up! 7 Tutorial 8 Input Trim 8 HPF (H
Introduction Introduction Fusion is an all-analogue stereo outboard processor created for the hybrid studio. Fusion introduces five completely new analogue colouration tools designed to bring the perfect combination of added tonal character, clarity and depth to your mix bus or stereo stems with the detail, warmth and finesse that only real analogue circuits can provide.
Introduction Hardware Overview Hardware Overview Unpacking The unit has been carefully packed and inside the box you will find the following items. This section will detail the hardware features found on Fusion.
Hardware Overview Setup Examples Signal Flow Overview A detailed Block Diagram is available in Appendix C. The diagram below gives you an overview of the signal path options Fusion provides. Setup Examples Connecting Fusion to an Audio Interface The examples below show how to connect Fusion to an audio interface, with and without hardware insert functionality in your DAW.
Setup Examples Start Me Up! Connecting Fusion to an Analogue Desk / Summing Mixer Fusion is the ideal analogue processor to complement your analogue summing system. The example below shows how to connect Fusion and an SSL Bus Compressor to your analogue desk or summing mixer.
Tutorial Tutorial Tutorial The 5 Colour Circuits The descriptions that follow cover each of Fusion’s 5 colouration circuits. Each circuit has an associated IN switch which allows you This section will go into detail about each front panel section. O/L to switch that particular circuit in or out. When a circuit is on it turns orange. When bypassed, the switch is backlit a soft white colour. Vintage Drive Left and Right Overload LEDs light red if the signal at Fusion’s input exceeds +27dBu.
Tutorial Tutorial Violet EQ The VIOLET EQ draws on the SSL legacy of carefully selected frequencies and response curves to create a musical and intuitive EQ, designed to let you quickly dial in low-end weight and high-end sheen. The design is based upon minimum-phase shift shelving filters. The frequency pots for each band are stepped. The LOW band offers choices of 30Hz, 50Hz, 70Hz or 90Hz. The HIGH band offers choices of 8kHz, 12kHz, 16kHz and 20kHz.
Tutorial Tutorial HF Compressor (High Frequency Compressor) Transformer This is a compressor circuit that only compresses high-frequencies. It helps to introduce a Fusion features a custom-designed SSL transformer circuit, which is engaged via the front panel transformer switch.
Tutorial Tutorial Insert (Standard Mode) Master Meter Fusion features a stereo insert point, which provides the ability to introduce other outboard processors A master meter, with three second peak hold allows you view the main output level of Fusion. The scale is such as the SSL G-Series Bus Compressor. The insert point is engaged via the front panel INSERT switch referenced in dBu, with +24dBu at the top.
Settings Mode & Factory Reset Settings Mode & Factory Reset Settings Mode & Factory Reset Factory Reset This section will detail how to enter Fusion's Settings Mode and the functionality that can be changed. It also details how to reset startup LED sequence. To reset Fusion to factory settings, switch the unit on then hold down the VINTAGE DRIVE IN and BYPASS switches during the Fusion back to a factory default state.
Troubleshooting & FAQ's Troubleshooting & FAQ's Troubleshooting & FAQ's Soak Mode Frequently Asked Questions can be found on the Solid State Logic Website at: http://www.solidstatelogic.com/support/fusion In soak mode the unit will cycle through all possible colours and modes of LEDs, to allow verification of the unit. To enter Soak Mode, switch the unit on and hold down the INSERT and BYPASS switches during the startup LED sequence.
Appendix A Appendix B Appendix A - Physical Specification Depth Appendix B - Analogue Specification Audio Performance 303mm / 11.9 inches (chassis only) Default test conditions (unless otherwise stated): 328mm / 12.9 inches (total including front panel controls) Height Width 88.9mm / 3.5inches (2 RU) 480mm / 19 inches Power 50 Watts maximum, 40 Watts typical Unboxed Weight 5.86kg / 12.9lbs Boxed Size 550mm x 470mm x 225mm (21.7" x 18.5" x 8.9") Boxed Weight 9.6kg / 21.
Appendix B Appendix C Measurement Conditions Crosstalk Analyser filters/BW: 22Hz to 20kHz (AES17). Generator Appendix C - System Block Diagram Value +24dBu into one channel, analyzer on the other channel (generator connected but not active). All circuits off / bypass Stereo Matching 22 -- 1 kHz -- < -110dB, -115dB typical -- 20Hz -- -110dB typical -- All circuits off / Bypass -- < 0.01dB -- Vintage Drive on -- < 0.
Appendix D Appendix D Appendix D - Safety Notices GB The apparatus shall be connected to mains socket outlets with a protective earthing connection. DEN Apparatets stikprop skal tilsluttes en stikkontakt med jord, som giver forbindelse tilstikproppens jord. General Safety FIN Laite on liitettävä suojamaadoituskoskettimilla varustettuun pistorasiaan. NOR -- Read these instructions. -- Keep these instructions. -- Heed all warnings. -- Follow all instructions.
Appendix D Appendix E Evaluation of apparatus based on altitude not exceeding 2000m. There may be some potential safety hazard if the apparatus is operated at altitude exceeding 2000m. Appendix E - Selecting Mains Voltage Fusion has a linear power supply and therefore needs to be manually switched to operate with 115V Evaluation of apparatus based on temperate climate conditions only. There may be some potential safety hazard if the either a 230V or 115V power suppy.
Appendix E Appendix F Appendix F - Recall Sheet Changing the fuse from 230V to 115V 1. Remove the IEC power cable from the IEC socket. 2. Remove the fastening by leveraging a flat-head screwdriver in the slot at the top of the fuse panel. 3. Remove the fuse cartridge, then remove both 0.5A fuses. 4. Re-orientate the fuse cartridge 180 degrees and place the new 1A fuses in the vacant slots on the cartidge. 5.
www.solidstatelogic.com Fusion. This is SSL.