MODEL/MODELO: 91749-SR Sears/Kmart USA INSTRUCCIONES DE ARMADO Please contact us before returning the product to the store. email: info@hi-mark.com, Toll Free: 844-675-7364 Por favor póngase en contacto con nosotros antes de devolver el producto a la tienda. email: info@hi-mark.
LIMITED 90 DAYS WARRANTY This product is covered by a limited warranty that is effective for 90 days from the date of purchase. If, during the limited warranty period, a part is found to be defective or breaks, we will offer replacement part at no cost to you, the customer. The only exceptions to the warranty include main frames, table tops, playing surfaces, batteries or tools.
IMPORTANT NOTICE! Please contact us before returning the product to the store. Please Keep Your Instructions! Your Model number is necessary should you need to contact us. Please read through this instruction manual book to familiarize yourself with all parts and assembly steps. Kindly refer to the parts list below and be sure that all parts have been included. Although we are dedicated to giving our customers the best product possible, a question may arise or parts may be missing.
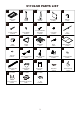
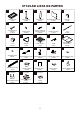
91749-SR PARTS LIST 1 2 Main Frame 1 Piece 6 3 Left Leg 2 Pieces 7 11 8 x 35mm Leg Bolt 12 Pieces 12 Chalk 2 Pieces 16 21 Corner Pocket Cap 4 Pieces 3.
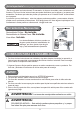
ASSEMBLY INSTRUCTIONS 1. Find a clean, level place to begin the assembly of your Billiard Table. The table will be assembled upside down and then turned over on its legs once the assembly completed. This game table is heavy, and turning it over will require at least four strong adults. 2. Remove all the parts from the box and verify that you have all of the listed parts as shown on the parts list page.
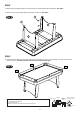
FIG.2 4. Attach the End Leg Brace (#4) to the Legs using six Screws (#8) per End Leg Brace. See FIG.2. 5. Attach the four Leg Levelers (#9) at the bottom of each leg. See FIG.2. FIG. 2 8 9 4 4 FIG.3 6. Lift the table assembly from the floor with four strong adults, turn it over, and set table on its legs in the location where you play. Go back and make sure that all connections are tight. 25 FIG. 3 24 26 CAUTION: Four strong adults are recommended to turn the table over as shown. 1.
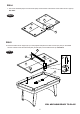
FIG.4 7. Tear off the backside paper of the EVA Pad (#16) and stick them at the bottom of the Table Tennis Top (#15). See FIG.4. FIG.4 15 15 16 FIG.5 8. Place the Table Tennis Support (#17) on the playfield and place the Table Tennis Tops (#15) on the billiard surface. And then Insert the Net Posts (#18) and Net (#21) on the Table Tennis Top. See FIG.5. 21 FIG.
GARANTÍA LIMITA DE 90 DIAS Este producto está cubierto por una garantía efectiva de 90 días a partir de la fecha de su compra. Durante el periódo límite de la garantía, si una parte defectuosa o quebrada es encontrada, nosotros ofreceremos una reparación o un reemplazo de la parte sin ningún costo para ud, nuestro cliente. Las únicas excepciones de la garantía incluyen marcos principales, tableros de mesa, superficies, pilas o herramientas.
¡Aviso Importante! Por favor póngase en contacto con nosotros antes de devolver el producto a la tienda. ¡Por favor guarde las instrucciones! Es necesario el número de modelo para contactarse con nosotros. Por favor léa las instrucciones para poder familiarize con las piezas y los pasos para ensamblar. Corrobore que todas las piezas que aparecen en el “Lista de Partes” se encuentren en el paquete.
91749-SR LISTA DE PARTES 1 2 Marco Principal 1 Pieza 6 3 Pierna Izquierda 2 Piezas 7 Cerrojo de Pierna 8x35mm 12 Piezas 11 16 Tiza 2 Piezas Almohadilla de EVA 8 Piezas 21 12 17 Red de Mesa de Tenis 1 Pieza 26 Pre-instalado Gorra de Bolsillo Esquina 4 Piezas Arandela 22mm 12 Piezas Triángulo 1 Pieza Pre-instalado De Tela de Bolsillo 6 Piezas 27 Pierna Derecha 2 Piezas 8 Soporte de Mesa de Tenis 1 Pieza 22 4 Pre-instalado Tuerca Cuadrada con Tornillos 4 Juegos 13 Pelota de Bill
INSTRUCCION DE MONTAJE 1. Encuentre un lugar limpio, plano para comenzar el montaje de su Mesa de Billar. La mesa será montada al revés y luego darle la vuelta sobre sus piernas una vez montada completa. Esta mesa de juego es pesada, para darle la vuelta se necesitaría por lo menos 4 adultos fuertes. 2. Quite todas las partes de la caja y verifique si estén todas las partes catalogadas como mostrado sobre la página de lista de partes.
FIG.2 4. Adjunte la Abrazadera de Pierna Final (#4) a las Piernas usando seis Tornillos (#8) por Abrazadera de Pierna Final. Vea la FIG. 2. 5. Adjunte los 4 Niveladores de Pierna (#9) al fondo de cada pierna. Vea la FIG. 2. 8 FIG. 2 9 4 4 FIG.3 6. Levante la mesa montada desde el piso con cuatro adultos fuertes, darle la vuelta, y coloque la mesa de sobre sus piernas en la posición donde usted juega. Vuelva y asegúrese que todas las conexiones están bien apretadas. 25 FIG.
FIG.4 7. Arranque el papel trasera de la Almohadilla de EVA (#16) y péguelos sobre el fondo de las Parte Superior del Tenis de Mesa (#15 & #16 ). Vea la FIG. 4. FIG.4 15 15 16 FIG.5 8. Coloque el Soporte del Tenis de Mesa (#17) sobre el Campo de Juego y coloque las Partes Superiores del Tenis de Mesa (#15) sobre la superficie de billar. Y luego inserte los Postes de Red (#18) y la Red (#21) sobre la Parte Superior del Tenis de Mesa. Vea la FIG.5. 21 FIG.