
User guide

ASSEMBLY & INSTALLATION - THRU-THE-WALL (CONT.)
14
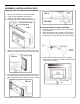
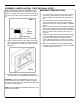
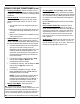
Refer to the SUPPORT BRACKET ASSEMBLY in the
WINDOW MOUNTING section to assemble the support
brackets. A wooden strip nailed to the outside wall should
be used in conjunction with the angled sill support brack-
ets.
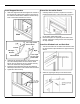
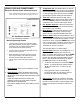
5. Screw or nail the cabinet to the wooden frame using
shims if the frame is oversized, to eliminate possible
noise. Remember to maintain proper slope for water
elimination.
6. Install the chassis into the cabinet by following the
steps described in the WINDOW MOUNTING section.
OPTIONAL: Caulking and installation of the trim on the
interior wall may be done if desired. Caulk the openings
around the top and sides of the cabinet and all sides of the
wood sleeve to the opening.
NOTE: See the WINDOW MOUNTING instructions for the
bottom rail seal location.
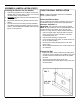
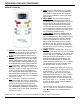
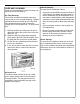
MASONRY CONSTRUCTION
1. Cut or build a wall opening in the masonry wall similar
to the frame construction (refer to the THRU-THE-
WALL installation for a wall thickness greater than 8
1/2”)..
2. Secure the cabinet in place using masonry nails, or
masonry anchor screws. Or, build a frame using the
instructions found in the THRU-THE-WALL installation
section.
3. Make sure the masonry above the cabinet is supported
well. Use the existing holes in the cabinet or additional
drilled holes to fasten the cabinet at various positions.
Make sure that the side louvers are clear of any ob-
structions.
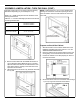
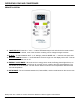
4. Install the exterior cabinet support brackets according
to the SUPPORT BRACKET INSTALLATION instruc-
tions in the THRU-THE-WALL installation section.
Caulk or flash with aluminum if needed. This will pro-
vide a tight seal around the top and sides of the cabi-
net.
5. For a more aesthetically pleasing installation, apply
wood trim molding around the sides of the cabinet with-
out obstructing the side louvers.
Support
Bracket
Wooden Strip
FIG. 3
FIG. 4