
Installation Guide

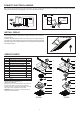

Run 120 V AC house wiring to the location of the fan. Use only UL-approved connectors (not included) to attach the house wiring to the
wiring plate. Refer to the wiring diagram, and connect the wires as shown.
Install ceiling material to complete the ceiling construction and cut around
the fan housing.
To attach the grille assembly to the fan housing, pinch the grille springs on
the sides of the grille assembly and position the grille into the housing with
the grille springs in the appropriate slots. Push the grille assembly towards
the ceiling to secure.
CONNECT ELECTRICAL WIRING
INSTALL GRILLE
SERVICE PARTS
3
UNIT
BLACK
SWITCH BOX
FAN
POWER SUPPLY
120V AC
GROUND (BARE)
WHITE
WIRE
PANEL
FAN
RECEPTACLE
A
FAN
Grille Assembly (includes part 2)
* Blower Assembly includes part 5, 6.
Replacement installation:
Remove the screw on motor plate (part 3), then take out
the motor plate (part 3) from the housing (part 8) by
pushing down the rib in the plate while pulling out on the
side of the housing. Replace the broken parts.
WARNING: Ensure that the fan is switched off from the
supply mains before replacing.
PART PART NAME Qty.
1
2
3
4
5
6
7
8
9
10
Housing
Blower Wheel
Wire Panel / Harness Assembly
Motor
1
2
1
1
1
1
4
1
1
a
Damper / Duct Connector
1
1
Motor Plate
Grille Spring
1
2
3
4
5
6
7
7
8
9
a
10
1
2
3
4
5
6
7
7
8
9
a
10
Hanger Bars
Wiring plate
Screw
PCV80
PCV50