
Installation Guide

BEARINGS AND LUBRICATION:
All S&P belt drive fan bearings are heavy duty, self-aligning ball type and are relubricable for continuous service.
Selection of the correct bearing grease and greasing intervals depends on several things. Extreme high or low
temperatures, dirty or damp surrounds, and vibration exceeding 1 or 2 mils are all things that will require more
frequent greasing or special greases. For standard service, use a lithium base grease that conforms to NLGI grade 2
consistency.
The motor bearings and the fan bearings on the belt drive fans should be greased at regular intervals. Motor
manufacturer’s greasing instructions and recommendations should be followed closely. Avoid the use of a pressure
greasing system which tends to ll the bearing chamber completely. Do not over grease. Use only 1 or 2 shots with
a hand gun in most cases. Maximum hand gun rating 40 P.S.I. Rotate bearings during lubrication where good safety
practice permits. NOTE: On motors with non-regreasable sealed bearings, no lubrication is required for the life of the
bearings.
Some of the most frequent causes of bearing failure is not greasing often enough, using an excessive quantity of
grease, or using incompatible greases. Excessive vibration, especially if the bearing is not rotating, will also cause
bearings to fail. Bearings must also be protected from water and moisture to avoid internal corrosion.
BEARING REPLACEMENT:
Fan bearings on belt drive fans should not need to be replaced for many years if the above recommendations are
strictly adhered to. However, use the following procedure when bearing replacement is necessary:
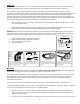
1. Gain access to the fan bearings. Remove the bearing cover, if any.
2. Loosen the belts by shifting the motor.
3. Remove the propeller and disconnect the remote lube tubes (if applicable).
4. Measure the location of the bearing to the propeller end of the shaft and the bearing spacing.
5. Remove the shaft and bearing assembly. Note the position of the bearings’ shims (if applicable).
6. Loosen all bearing/shaft setscrews or other locking device.
7. Remove bearings (may have to be pressed off the shaft).
8. Polish the shaft with ne emery paper (240 Grit or ner) and le the setscrew dimples at.
9. Install new bearings on the shaft, making sure that the collars are together, (i.e., facing each other on the
shaft). Lightly seat one setscrew or eccentric locking collar on each bearing to hold in the approximate
marked position.
10. Mount the shaft/bearing assembly in the fan, with bolts. Do not tighten yet. Just snug up. Loosen the
setscrew.
11. Center the shaft in the house (both ends) as closely as possible. (The fan propeller may need to be
temporarily installed to get its clearances equal).
12. Tighten the bearing mounting bolts.
13. Reinstall the lube tubes (if applicable).
14. Install bearing cover, propeller, and belts, and adjust the motor to get proper belt tension. Also, make sure that
the sheaves are properly aligned.
15. If a new shaft is supplied, then ignore items #6 through #8.
4