
Installation Manual
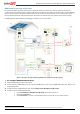


Backup Power with Smart Energy Management - System Configurations
14
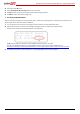
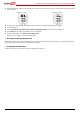
2 Set the dip switches of Battery 2 to ID 25: Move dip switch 1 to position 1 (to the left), move dip switches 2 and 3 to position
0 (to the right).
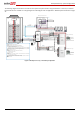
Battery 1 – ID 24:
Battery 2 - ID 25:
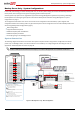
3 Configure the meter, Battery 1 and backup power as described in the Basic Configuration on page 8.
4 Configure Battery 2:
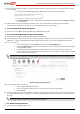
5 Select Communication RS485-1 Conf Device Type Multi-devices. A list of devices is displayed.
6 Select Battery 2. The battery configuration screen is displayed.
7 Configure the battery: Select Device Type Battery Pack.
Battery 2 is pre-configured to Tesla with device ID 25.
► Set up Smart Energy Management
After configuring the meter, battery and backup power, proceed with maximizing self-consumption or charge/discharge profile
programming as described in the Basic Configuration on page 10.
► Verifying Communication:
Verify communication as described in the Basic Configuration on page 11.