
Installation Manual
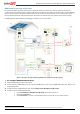


Backup Power with Smart Energy Management - System Configurations
11
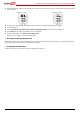
2 Select AC Charge Enable.
3 Select AC Charge Lim Limit Type and set one of the limits:
4 Set %PV to enter a limit as a percentage of year-to-date energy production.
5 Set kWh to enter a fixed annual energy limit.
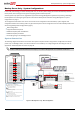
► To verify communication:
After connecting and configuring a communication option, perform the following steps to check that the connection to the
monitoring server has been successfully established.
1 Turn on the AC to the inverter by turning ON the circuit breaker on the main distribution panel.
2 Wait for the inverter to connect to the SolarEdge monitoring portal. This may take up to two minutes.
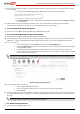
A status screen similar to the following appears on the LCD panel:
S_OK: Indicates that the connection to the SolarEdge monitoring portal is successful.
If S_OK is not displayed and/or errors are displayed on the LCD, refer to Errors and Troubleshooting in
http://www.solaredge.com/files/pdfs/products/inverters/se-single-and-three-phase-inverter-user-manual-na.pdf.
3 For additional verification, refer to Appendix C – Verifying StorEdge Functionality on page 35.