
Install Manual
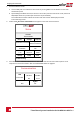

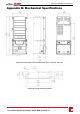


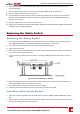
Table Of Contents
- Disclaimers
- Support and Contact Information
- Revision History
- HANDLING AND SAFETY INSTRUCTIONS
- IMPORTANT SAFETY INSTRUCTIONS
- Chapter 1: Introducing the SolarEdge Power Harvesting System
- Chapter 2: Installing the Power Optimisers
- Chapter 3: Installing the Inverter
- Chapter 4: Connecting the AC and the Strings to the Safety Switch
- Chapter 5: Activating, Commissioning and Configuring the System Using the Inverter SetApp
- Chapter 6: Setting Up Communication
- Appendix A: Errors and Troubleshooting
- Appendix B: Mechanical Specifications
- Appendix C: External Fan Maintenance and Replacement
- Appendix D: Replacing and Adding System Components
- Technical Specifications - Three Phase Inverters (North America)

Appendix D: Replacing and Adding System
Components
ThisappendixincludesreplacementproceduresfortheSolarEdgesystemcomponents.Forinverteror
SafetySwitchreplacement,typicallyonlytheparttobereplacedissupplied(notbothinverterandSafety
Switch).Inthiscase,theSafetySwitchshouldbedisconnectedfromtheinverterasdescribedherein.
NOTE
If you are permanently disassembling the installation or part of it, make sure to use the disposal
methods dictated by local regulations.
CAUTION!
Do not remove the six screws on the DC conduit metal panel as it may
harm the inverter sealing and void the warranty.
ATTENTION!
Ces vis ne doivent pas être retirées. Les enlever est susceptible
d’endommager l’étanchéité de l’onduleur et annuler la validité de la
garantie.
Replacing an Inverter
1. TurnOFFtheSafetySwitch(ifapplicable).
2. TurnOFFtheinverterON/OFF/Pswitch,andwaituntilthegreenLEDisblinking,indicatingthatthe
DCvoltageissafe(<50V),orwaitfiveminutesbeforecontinuingtothenextstep.
3. DisconnecttheACtotheinverterbyturningOFFthecircuitbreakersonthedistributionpanel.
4. OpentheinvertercoverasdescribedinRemovingtheInverterCoveronpage54.
5. DisconnecttheDCandACwiresfromtheinverter.IfthereareferritebeadsontheDCandACwiresin
theinverter,openthebeadsandsetthemaside.
6.
UnscrewthetwoconduitnutsintheinvertersecuringtheSafetySwitchtotheinverter.
Figure 43: Conduit nuts
7. Removethescrewssecuringtheinvertertothemountingbracketandremovetheinverterfromthe
mountingbracket.
NOTE
If you remove the old inverter and do not immediately install a new one, then:
o
Lock the Safety Switch in the OFF position using a lock on the switch.
o
Use insulation tape to isolate each of the AC and DC wires.
o
Seal the open conduits using duct tape.
-Three Phase System Installation Guide MAN-01-00527-1.1
68
Appendix D: Replacing and Adding System Components