
Install Manual
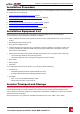
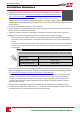
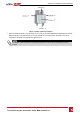
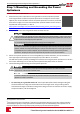
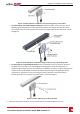
Table Of Contents
- Disclaimers
- Support and Contact Information
- Revision History
- HANDLING AND SAFETY INSTRUCTIONS
- IMPORTANT SAFETY INSTRUCTIONS
- Chapter 1: Introducing the SolarEdge Power Harvesting System
- Chapter 2: Installing the Power Optimisers
- Chapter 3: Installing the Inverter
- Chapter 4: Connecting the AC and the Strings to the Safety Switch
- Chapter 5: Activating, Commissioning and Configuring the System Using the Inverter SetApp
- Chapter 6: Setting Up Communication
- Appendix A: Errors and Troubleshooting
- Appendix B: Mechanical Specifications
- Appendix C: External Fan Maintenance and Replacement
- Appendix D: Replacing and Adding System Components
- Technical Specifications - Three Phase Inverters (North America)

Figure 4: Power optimizer installation and grounding using a star washer
l For mounting on rails with sliding nut fasteners:Ifthestarwashercannotbeused,usethe
SolarEdgegroundingplate(purchasedseparately)betweentherailingandtheflatsideofthe
mountingbracket.Usemountingspecifichardwareasneeded.Applytorqueof9.5N*m/7lb*ft.
SeeFigure5
Figure 5: Power optimizer installation and grounding using a grounding plate
l For mounting on un-grounded structures(suchasawoodenstructure):Ifthestarwasheror
theplatecannotbeused,usetheSolarEdgegroundinglug(purchasedseparately)withan
equipment-groundingconductoraccordingtothesuppliedinstructions.Thegroundingterminal
acceptsawiresizeof6-14AWG,andmustbesizedforequipmentgroundingperNEC250.122
requirements.Tightenthescrewsconnectingthepoweroptimizertotheframeandthe
groundingterminalscrew.Applytorqueof9.5N*m/7lb*ft.SeeFigure6
Figure 6: Power optimizer grounding terminal
5. Verifythateachpoweroptimizerissecurelyattachedtothemodulesupportstructure.
Chapter 2: Installing the Power Optimisers
-Three Phase System Installation Guide MAN-01-00527-1.1
19