
SE9K SetApp Enabled Manual

Removing the Inverter Cover
If the inverter cover is not already removed, use the following procedure for cover
removal.
To remove the inverter cover
1. Turn the inverter ON/OFF/P switch to OFF. Wait 5 minutes for the capacitors to
discharge.
2. Turn the Safety Switch to OFF.
3. Disconnect the AC to the inverter by turning OFF the circuit breakers on the
distribution panel.
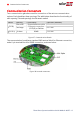
4. Open the Allen screws of the inverter cover and carefully pull the cover horizontally
before lowering it.
CAUTION!
When removing the inverter cover, make sure not to damage the internal
components. SolarEdge will not be held responsible for any components
damaged as a result of incautious cover removal.
ATTENTION!
Lors du retrait du couvercle, assurez-vous de ne pas endommager les
composants internes. SolarEdge ne peut être tenue pour responsable des
composants endommagés à la suite d'une imprudence dans le retrait du
couvercle.
Creating an Ethernet (LAN) Connection
This communication option enables using an Ethernet connection to connect the
inverter to the monitoring platform through a LAN.
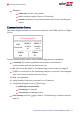
Ethernet cable specifications:
Cable type – a shielded Ethernet cable (Cat5/5E STP) may be used
Maximum distance between the inverter and the router – 100 m/ 330 ft.
NOTE
If using a cable longer than 10 m / 33 ft in areas where there is
a risk of induced voltage surges by lightning, it is recommend
to use external surge protection devices.
For details refer to:
https://www.solaredge.com/sites/default/files/overvoltage_surge_
protection_na.pdf.
Chapter 6: Setting Up Communication 69
Three
Phase
System
Installation
Guide
MAN-01-00527-1.2