
Installation Guide


Table Of Contents
- Disclaimers
- Support and Contact Information
- Revision History
- Contents
- HANDLING AND SAFETY INSTRUCTIONS
- IMPORTANT SAFETY INSTRUCTIONS
- Chapter 1: Introducing the SolarEdge Power Harvesting System
- Chapter 2: Installing the Power Optimizers
- Chapter 3: Installing the Inverter
- Chapter 4: Connecting the AC and the Strings to the Safety Switch
- Chapter 5: Commissioning the Installation
- Chapter 6: User Interface
- Chapter 7: Setting Up Communication
- Appendix A: Errors and Troubleshooting
- Appendix B: Mechanical Specifications
- Appendix C: External Fan Maintenance and Replacement
- Appendix D: Replacing and Adding System Components
- Appendix E: Determining the Circuit Breaker Size
- Technical Specifications - Single Phase Inverters (North America)
- Technical Specifications - Three Phase Inverters (North America)
External Fan Replacement
1. Turn OFF the inverter ON/OFF switch, and wait until the LCD indicates that the DC
voltage is safe (<50V), or wait five minutes before continuing to the next step.
WARNING!
If you cannot see the inverter panel, or if a malfunction is indicated on the
LCD panel, wait five minutes for the input capacitors of the inverter to
discharge.
AVERTISSEMENT!
Si vous ne pouvez pas voir l'écran de l'onduleur ou si un dysfonctionnement
est indiqué sur l'écran LCD, attendez cinq minutes pour que les
condensateurs d'entrée de l'onduleur soient déchargés.
2. Turn OFF the Safety Switch and the AC breaker of the distribution panel.
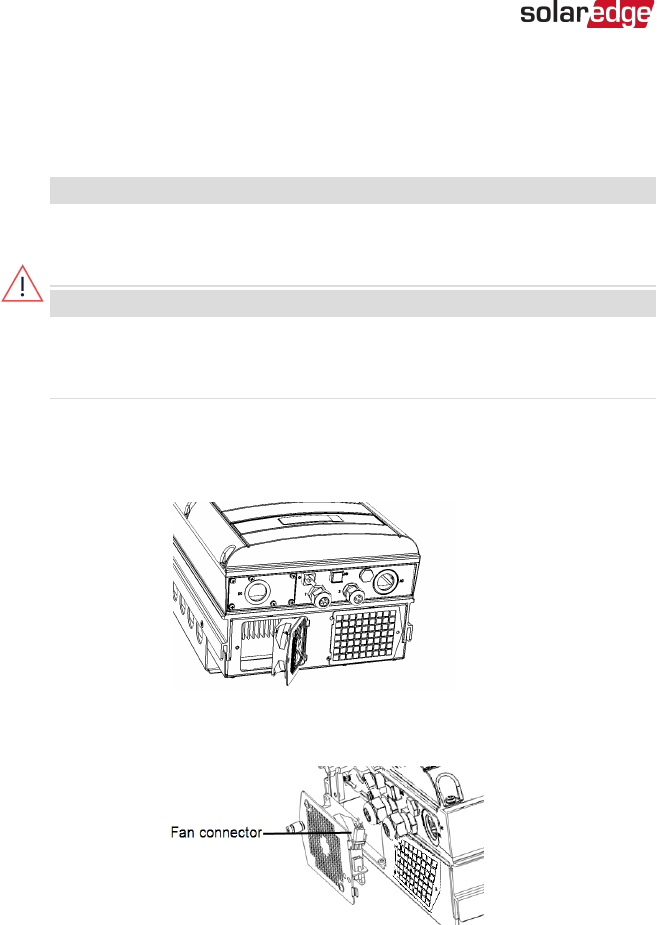
3. Use a standard screwdriver to unfasten the single screw of the fan cover.
4. Open the fan door.
Figure 41: Fan door open
5. Disconnect the fan connector and remove the fan.
Figure 42: Fan connector
6. Connect the fan connector to the new fan.
7. Close the fan door and fasten the cover screw.
-Three Phase System Installation Guide MAN-01-00002-4.3
102 External Fan Replacement