
Energy Hub with Prism Technology Installation Guide
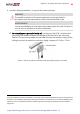
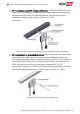

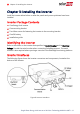
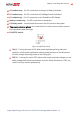
Table Of Contents
- Disclaimers
- Revision History
- HANDLING AND SAFETY INSTRUCTIONS
- IMPORTANT SAFETY INSTRUCTIONS
- Chapter 1: Overview
- Chapter 2: Installing the Power Optimizer
- Chapter 3: Installing the Inverter
- Chapter 4: Installing the Battery
- Chapter 5: Connecting the Inverter
- Chapter 6: Activating, Commissioning and Configuring the System
- Chapter 7: Setting Up Communication to the Monitoring Platform
- Appendix A: Errors and Troubleshooting
- Appendix B: Mechanical Specifications
- Appendix C: Replacing and Adding System Components
- Appendix D: Powering the LG Chem Battery Off and On
- Single Phase Energy Hub Inverter with Prism Technology - Technical Specificat...
- Support Contact Information

For mounting on rails with sliding nut fasteners: If the star washer cannot be
used, use the SolarEdge grounding plate (purchased separately) between the
railing and the flat side of the mounting bracket. Use mounting specific
hardware as needed. Apply a torque of 9.5 N*m / 7 lb*ft.
See
Figure 4
.
Figure 4: Power optimizer installation and grounding using a grounding plate
For mounting on un-grounded structures (such as a wooden structure): If the
star washer or the plate cannot be used, use the SolarEdge grounding lug
(purchased separately)with an equipment-grounding conductor according to
the supplied instructions. The grounding terminal accepts a wire size of 6-14
AWG, and must be sized for equipment grounding per NEC 250.122
requirements. Tighten the screws connecting the power optimizer to the frame
and the grounding terminal screw. Apply a torque of 9.5 N*m / 7 lb*ft.
Figure 5: Power optimizer grounding terminal
Single Phase Energy Hub Inverter with Prism Technology MAN-01-00671-1.3
22 Step 1: Mounting and Grounding the Power Optimizers