
Install Manual

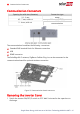


Table Of Contents
- Disclaimers
- Revision History
- HANDLING AND SAFETY INSTRUCTIONS
- IMPORTANT SAFETY INSTRUCTIONS
- Chapter 1: Overview
- Chapter 2: Installing the Power Optimizer
- Chapter 3: Installing the Inverter
- Chapter 4: Installing the Battery
- Chapter 5: Connecting the Inverter
- Chapter 6: Activating, Commissioning and Configuring the System
- Chapter 7: Setting Up Communication to the Monitoring Platform
- Appendix A: Errors and Troubleshooting
- Appendix B: Mechanical Specifications
- Appendix C: Replacing and Adding System Components
- Appendix D: Powering the LG Chem Battery Off and On
- Single Phase Energy Hub Inverter with Prism Technology - Technical Specificat...
- Support Contact Information

2. Turn the Connection Unit (if applicable) to OFF.
3. Disconnect the AC to the inverter by turning OFF the circuit breakers on the
distribution panel.
4. Open the Allen screws of the inverter cover and carefully pull the cover horizontally
before lowering it.
CAUTION!
When removing the inverter cover, make sure not to damage the internal
components. SolarEdge will not be held responsible for any components
damaged as a result of incautious cover removal.
ATTENTION!
Lors du retrait du couvercle, assurez-vous de ne pas endommager les
composants internes. SolarEdge ne peut être tenue pour responsable des
composants endommagés à la suite d'une imprudence dans le retrait du
couvercle.
Removing the Connection Unit Cover
1. Turn OFF the AC breaker of the distribution panel and the safety switch (if
applicable).
2. Open the Connection Unit cover: Release the four Allen screws and remove the
cover.
CAUTION!
When removing the Connection Unit cover, make sure not to damage the
internal components. SolarEdge will not be held responsible for any
components damaged as a result of incautious cover removal.
ATTENTION!
Lors du retrait du couvercle, assurez-vous de ne pas endommager les
composants internes. SolarEdge ne peut être tenue pour responsable des
composants endommagés à la suite d'une imprudence dans le retrait du
couvercle.
Creating an Ethernet (LAN) Connection
This communication option enables using an Ethernet connection to connect the
inverter to the monitoring platform through a LAN.
Chapter 7: Setting Up Communication to the Monitoring Platform 57
Single Phase Energy Hub Inverter with Prism Technology MAN-01-00671-1.2