
Energy Hub with Prism Technology Installation Guide
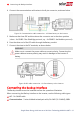
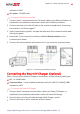
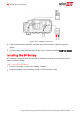
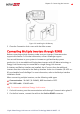
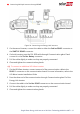
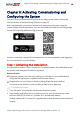
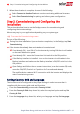

Table Of Contents
- Disclaimers
- Revision History
- HANDLING AND SAFETY INSTRUCTIONS
- IMPORTANT SAFETY INSTRUCTIONS
- Chapter 1: Overview
- Chapter 2: Installing the Power Optimizer
- Chapter 3: Installing the Inverter
- Chapter 4: Installing the Battery
- Chapter 5: Connecting the Inverter
- Chapter 6: Activating, Commissioning and Configuring the System
- Chapter 7: Setting Up Communication to the Monitoring Platform
- Appendix A: Errors and Troubleshooting
- Appendix B: Mechanical Specifications
- Appendix C: Replacing and Adding System Components
- Appendix D: Powering the LG Chem Battery Off and On
- Single Phase Energy Hub Inverter with Prism Technology - Technical Specificat...
- Support Contact Information

Figure 23: Installing the 9V Battery
3. Close the Connection Unit covers with the Allen screws.
Connecting Multiple Inverters through RS485
Before connecting multiple inverters, make sure your inverters' firmware version
supports this feature. For further information, contact SolarEdge support.
You can add inverters to your system to increase on-grid and backup power
production. Up to two additional Single phase inverters with HD-Wave technology or
Energy Hub inverters may be connected to a single Energy Hub inverter.
If a battery and Backup Interface are installed, the ACoutput from the additional
inverters must be connected to the Backup Interface. Use a circuit breaker (CB-UPG-xx-
01) purchasable from SolarEdge. For more information, refer to the
Backup Interface
Installation Guide
.
When connecting multiple inverters, use the following cable types:
Communication - 24 AWG (16-24AWG), 600V insulated or CAT5
12V- RSD cable- 16 AWG cable
To connect an additional Energy Hub inverter:
1. On both inverters, pass the communication cable through Communication gland 2.
2.
On the first inverter, connect the cable to the 2nd Inv RS485 connector.
Chapter 5: Connecting the Inverter 43
Single Phase Energy Hub Inverter with Prism Technology MAN-01-00671-1.3