
Energy Hub with Prism Technology Installation Guide
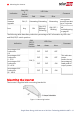
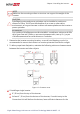
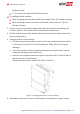

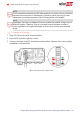
Table Of Contents
- Disclaimers
- Revision History
- HANDLING AND SAFETY INSTRUCTIONS
- IMPORTANT SAFETY INSTRUCTIONS
- Chapter 1: Overview
- Chapter 2: Installing the Power Optimizer
- Chapter 3: Installing the Inverter
- Chapter 4: Installing the Battery
- Chapter 5: Connecting the Inverter
- Chapter 6: Activating, Commissioning and Configuring the System
- Chapter 7: Setting Up Communication to the Monitoring Platform
- Appendix A: Errors and Troubleshooting
- Appendix B: Mechanical Specifications
- Appendix C: Replacing and Adding System Components
- Appendix D: Powering the LG Chem Battery Off and On
- Single Phase Energy Hub Inverter with Prism Technology - Technical Specificat...
- Support Contact Information

NOTE
In case of inverter replacement with the Connection Unit still mounted, it is
recommended to use all 3 holes.
a.
Mark the location of the bracket screw for the Connection Unit, and optionally
the two additional bracket holes.
Figure 14: Connection Unit bracket
b. Remove the inverter from the wall/ pole.
c. Drill the hole for the Connection Unit bracket.
d. Hang the inverter on the mounted brackets.
e. Fasten the Connection Unit bracket using a standard bolt.
7. Insert the screws at the top of the inverter brackets and fasten the brackets together.
8. Verify that all the brackets are firmly attached to the mounting surface.
Selecting a Residual Current Device (RCD)
IMPORTANTSAFETYFEATURE
All SolarEdge inverters incorporate a certified internal Residual Current Device
(RCD) in order to protect against possible electrocution and fire hazard in case
of a malfunction in the PV array, cables or inverter. There are two trip
thresholds for the RCD as required for certification. The default value for
electrocution protection is 30 mA, and for slow rising current is 300 mA.
If an external RCD is required by local regulations, check which type of RCD is required
for the relevant electric code. Install the residual-current device (RCD) in accordance
with the applicable local standards and directives. SolarEdge recommends using a type-
A RCD. The recommended RCD value is 100 mA or 300 mA unless a lower value is
required by the specific local electric codes. When required by local regulations, the use
of an RCD type B is permitted.
NOTE
For multiple inverters, an RCD per inverter is required.
Chapter 3: Installing the Inverter 33
Single Phase Energy Hub Inverter with Prism Technology MAN-01-00671-1.3