
Install Manual


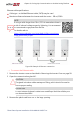
Table Of Contents
- Disclaimers
- Revision History
- Contents
- HANDLING AND SAFETY INSTRUCTIONS
- IMPORTANT SAFETY INSTRUCTIONS
- Chapter 1: Introducing the SolarEdge Power Harvesting System
- Chapter 2: Installing the Power Optimizer
- Chapter 3: Installing the Inverter
- Chapter 4: Connecting the AC and the Strings to the Safety Switch
- Chapter 5: Activating, Commissioning and Configuring the System
- Chapter 6: Setting Up Communication to the Monitoring Platform
- Appendix A: Errors and Troubleshooting
- Appendix B: Mechanical Specifications
- Appendix C: External Fan Maintenance and Replacement
- Appendix D: Replacing and Adding System Components
- Determining the Circuit Breaker Size
- Support Contact Information

Since the inverter is ON, the power optimizers start producing power and the
inverter starts converting AC.
WARNING!
When you turn ON the inverter ON/OFF/P switch, the DC cables carry a high
voltage and the power optimizers no longer output a safe output.
AVERTISSEMENT!
Après avoir mis l'interrupteur ON/OFF/P de l'onduleur monophasé sur ON,
les câbles DC portent une haute tension et les optimiseurs de puissance ne
génèrent plus la tension de sécurité.
When the inverter starts converting power after the initial connection to the AC, the
inverter enters Wake up mode until its working voltage is reached. This mode is
indicated by the flickering green inverter LED.
When working voltage is reached, the inverter enters Production mode and
produces power. The steadily lit green inverter LED indicates this mode.
4. Tap OK to return to the Commissioning menu.
Communication
Communication settings can be configured only after communication connections are
complete. Refer to
Setting Up Communication to the Monitoring Platform
on page 55.
Select Monitoring Communication to configure communication with the
monitoring platform.
Select Site Communication to configure communication between multiple
SolarEdge devices or external non-SolarEdge devices, such as batteries or loggers.
Three Phase System Installation Guide MAN-01-00527-1.4
50 Step 2: Commissioning and Configuring the Installation