
Install Manual
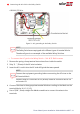
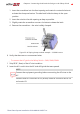
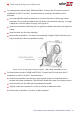
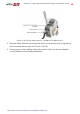
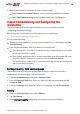
Table Of Contents
- Disclaimers
- Revision History
- Contents
- HANDLING AND SAFETY INSTRUCTIONS
- IMPORTANT SAFETY INSTRUCTIONS
- Chapter 1: Introducing the SolarEdge Power Harvesting System
- Chapter 2: Installing the Power Optimizer
- Chapter 3: Installing the Inverter
- Chapter 4: Connecting the AC and the Strings to the Safety Switch
- Chapter 5: Activating, Commissioning and Configuring the System
- Chapter 6: Setting Up Communication to the Monitoring Platform
- Appendix A: Errors and Troubleshooting
- Appendix B: Mechanical Specifications
- Appendix C: External Fan Maintenance and Replacement
- Appendix D: Replacing and Adding System Components
- Determining the Circuit Breaker Size
- Support Contact Information

1. Insert the screwdriver into the front opening and rotate it counterclockwise to
activate the clamp mechanism. The side latch holds the clamp in the open
position.
2. Insert the wire into the side opening as deep as possible.
3. Slightly rotate the screwdriver counter-clockwise to release the latch.
4. Remove the screwdriver – the wire is safely clamped.
Figure 22: AC Spring-clamp terminal example - 33.3KW inverter
6. Verify that there are no unconnected wires.
To connect the AC grid to the Safety Switch – 9kW, 10kW, 20kW:
1. Strip 05⁄16'' (8mm) of the AC wire insulation.
2.
Insert the AC conduit into the AC-side drill guide that was opened.
NOTE
Connect the equipment grounding before connecting the AC wires to the
AC.
Veillez à relier le conducteur de PE (la terre) avant de connecter les fils CA
au bornier CA.
Chapter 4: Connecting the AC and the Strings to the Safety Switch 43
Three Phase System Installation Guide MAN-01-00527-1.4