
Install Manual
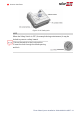
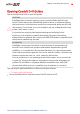
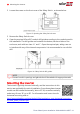
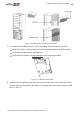
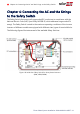
Table Of Contents
- Disclaimers
- Revision History
- Contents
- HANDLING AND SAFETY INSTRUCTIONS
- IMPORTANT SAFETY INSTRUCTIONS
- Chapter 1: Introducing the SolarEdge Power Harvesting System
- Chapter 2: Installing the Power Optimizer
- Chapter 3: Installing the Inverter
- Chapter 4: Connecting the AC and the Strings to the Safety Switch
- Chapter 5: Activating, Commissioning and Configuring the System
- Chapter 6: Setting Up Communication to the Monitoring Platform
- Appendix A: Errors and Troubleshooting
- Appendix B: Mechanical Specifications
- Appendix C: External Fan Maintenance and Replacement
- Appendix D: Replacing and Adding System Components
- Determining the Circuit Breaker Size
- Support Contact Information

Figure 16: Hanging the inverter on the bracket
7.
For inverters with Safety Switch - secure the Safety Switch bracket to the wall:
Mark the location of the bracket screw for the Safety Switch and drill the hole.
Fasten the bracket using a standard bolt.
Verify that the bracket is firmly attached to the mounting surface.
Figure 17: Safety Switch bracket
8. Insert the two supplied screws through the outer heat sink fin on both sides of the
inverter and into the bracket (see
Figure 16
). Tighten the screws with a torque of 4.0
N*m / 2.9 lb.*ft.
Chapter 3: Installing the Inverter 37
Three Phase System Installation Guide MAN-01-00527-1.4