
Quick Installation Guide

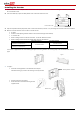
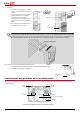

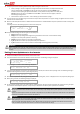
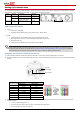
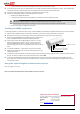
Table Of Contents
- SolarEdge Quick Installation Guide – North America

3
Mounting
tab
Indentation
Bracket screw
Safety Switch
bracket
For type 2:
Install the mounting bracket on the wall
with the flat side of the bracket is at the
bottom.
Hang the inverter on the bracket: Align
the two indentations in the inverter
enclosure with the two triangular
mounting tabs of the bracket, and lower
the inverter until it rests on the bracket
evenly.
Secure the inverter to the bracket using
the two supplied 5mm screws.
NOTE:
When mounting an inverter with Type 2 bracket on an uneven surface, you may use spacers/washers behind the top mounting hole
of the bracket. Depending on the angle, use the appropriate size and number of spacers so that the bracket is perpendicular to the
ground. Recommended: a stainless steel 3/4" long screw, with a 1/4" socket button head, two jam nuts and three washers.
5 Optionally, secure the Safety Switch bracket to the wall:
Mark the location of the bracket screw for the Safety Switch and drill the hole.
Fasten the bracket using a standard bolt.
Connecting the Strings and the AC to the Safety Switch
An example of the Safety Switch connections is shown below. For more information, refer to the note in the device and to the SolarEdge
Installation Guide.
AC side
conduit
DC side
conduit
DC
connections
+ + - -
AC
connections
Revenu Grade Meter (RGM)
RGM plate
Safety Switch for single phase inverter 10-11.4kW with built-in RGM