
Quick Installation Guide

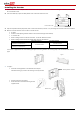
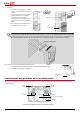

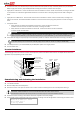
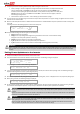
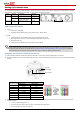
Table Of Contents
- SolarEdge Quick Installation Guide – North America

2
Hang here
Bracket screw
Single phase example
Mounting bracket orientation
Loosen these screws
Installing the Inverter
1 Make sure that the inverter ON/OFF switch at the bottom of the inverter is switched OFF before and during the installation, and that the
AC circuit breaker is OFF.
2 Use a 5mm Allen key to open the Safety Switch cover screws and remove the cover.
3 Open the required knockout pair (bottom, back or sides of the enclosure, sized ¾'' or 1'') according to the conduits used in the installation.
4 Make sure to leave clearance areas in order to cool the inverter:
8" above
At least 4" below (leaving sufficient clearance for conduits entering from the bottom)
4" on either side
When installing inverters one above of the other - at least 16" between inverters.
When installing inverters side by side, follow these clearance specifications:
Single Phase Inverters
Three Phase Inverters
Locations where the yearly average high
temperature is below 25˚C/77˚F
8" between inverters
8" between inverters
Locations where the yearly average high
temperature is above 25˚C/77˚F
16" between inverters
The inverter is supplied with one of the following two types of mounting brackets.The mounting steps in the next sections refer to these
types.
For type 1:
Install the mounting bracket on the wall with the U-shaped
indentations facing up, and the “UP” marking is correctly oriented.
Hang the inverter on the bracket.
Secure the inverter to the bracket using the two
supplied screws.
Type 1 Type 2