
Installation Guide
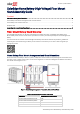
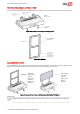
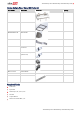
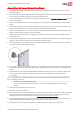
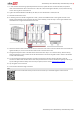
Table Of Contents

Home Battery Floor Mount Battery Stand Assembly Guide 5
Home Battery Floor Mount Battery Stand Assembly Guide
17. In case the floor stand is being optionally fastened to the floor, replace the floor connector brackets, and position
them over the drilled hole. Secure to the floor at 17Nm/150 in lb and then tighten the M10 (11/16”) bracket securing
nuts on each leg also at 17Nm/150 in lb.
18. Tighten the two Wall Bracket screws M5 (5/32” Allen) on each wall bracket at 17Nm/150 in lb.
19. Assemble the decorative cover.
20. If installing more floor stands arranged front to back , position the additional base mount against the front of the
already positioned base mount and repeat the floor mount assembly process for steps 1-8. The figure indicates how
the batteries are arranged and attached to each other.
21. Attach the Stand to Stand connectors from the front of the rear base mount to the two internal base mount studs and
tighten the M8 (1/2”) nuts to secure the front base mount to the rear base mount.
22. Disregard the steps that refer to the wall bracket and continue from step 11 to mount the battery, wire the battery,
attach the decorative cover, and then secure the two batteries to each other using M5 screws to attach a side bracket
to each side of the battery.
23. You can reverse the positioning of the floor connector bracket for the last floor stand in the bank so that the
connector is hidden under the front of the stand. This prevents the floor connector bracket from getting in the way of
anyone walking around the battery stand. This step is optional, see the caution Optional Floor Connector
.
24. Clip the gutter cover to the base.
25. Screw the front decorative logo to the base.
Note
Use the QR-Code to view a video that shows you how to wire and chain up to 3 batteries together on floor stands.