
Installation Guide
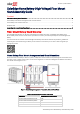
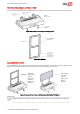
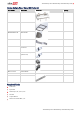
Table Of Contents

Home Battery Floor Mount Battery Stand Assembly Guide
Assembling the Home Battery Floor Stand
Assembling the Home Battery Floor Stand
1. Unpackage the SolarEdge Home Battery Floor Mount Stand kit and arrange the parts so you can check the parts
against the parts list.
2. Move and position the floor mount base close to but not against the wall to which it will be secured. Position the base
so that the front of the base is parallel to and facing away from the wall.
3. Level and set the height of the base mount using a 5mm Allen key to turn the leg height adjustment screws for each of
floor mount base legs.
4. Hold the back holder so that the six studs are facing toward you and the connecting strut with four holes is at the
bottom.
5. Lower the back holder over the four connecting studs located at the rear of the base. As you do this, the two lower
studs on the Back Holder must sit in the outer slots of the Back Holder Securing Bracket.
6. Loosely screw the M8 (1/2”) nuts onto each of the back holder and base studs to hold the back holder in place. Fully
tighten at 17Nm/150 in lb to finally secure the back holder.
7. Hold the wall mount, front facing you, and position the mount on the securing studs of the back-holder’s battery
mounting bracket.
8. Loosely screw an M8 (1/2”) nut onto each of the four back holder studs to hold the wall mount in place and then fully
tighten at 17Nm/150 in lb to finally secure the wall mount as shown in Figure 4.
9. Use the M5 (5/32” Allen) short screw to attach the lower slot of the wall bracket to each side of the wall mount and
then position the Floor Mount against the wall.
10. Use the holes in the wall bracket to mark the position on the wall for three attachment holes on each side. Move the
Floor Mount aside to allow access to drill. Drill the holes, reposition the Floor Mount and attach the wall brackets to
the wall.
11. (Optional) Insert a floor connector bracket between the bracket securing nut and the foot of each leg. Position the
floor connector bracket and mark a drilling hole. Remove the bracket and drill the floor attachment holes.
CAUTION
!
Attaching the Floor Connector Brackets is optional. This step should be only be performed after determining
that doing so does not
:
Breach any local or national safety codes.
Damage any infrastructure built into the floor. For example, sealing, plumbing lines or floor heating
systems.
12. Position and hang the battery on the wall mount.
13. Check that the battery is turned off.
14. Open the wiring gutter on the left side of the floor mount base and lay the wires in place. Pass the cables through the
wiring sleeve on the top left side of the floor mount base and connect to the battery. If installing more than one
battery per inverter, use branch connectors. See the Home Battery Quick Installation Guide.
15. Insert and loosely tighten the long m5 wall bracket securing screw in the upper wall bracket slot on each side. The
long securing screw threads through the battery housing and acts a safety suspension pin.
16. Recheck that the stand is level and if necessary fine tune the height of the legs until the stand is level.