
Manual


Construction!
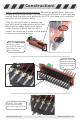
Step 9 - Installing the microcontroller: Now we are getting to the best part -
installing the microcontroller! The important part is to get it in the right-way
around. Note the little curve printed on the PCB, and make sure it matches
the notch on the microcontroller.
Slide the microcontroller in between the
legs so it grips the wide-portion of the legs.
When you are happy with the fit, lightly
solder the pins in place. Not too much
solder! You do not want solder to slide down
to the microcontroller pin tips.
Step 9a: Important!
Note the curve
on the PCB matches
the notch on the
microcontroller
Step 9c: Tack solder
the PCB pins down,
just to the top of the pin
Step 9b: Push the
microcontroller in
between the pins,
just to the wide
part
www.solarbotics.com
6
Ardweeny Manual v1.3