
Manual


Construction!
You have a breadboard that needs an Arduino - Get to work! Never
soldered before? Download a copy of our soldering tutorial here:
http://downloads.solarbotics.com/pdf/solderingtutorial.pdf
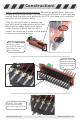
Step 1 - 0.1µF Capacitors: One is for power filtration, the other is part of the
auto-reset function when a program is finished uploading. Stick one in
position ‘C1’, and the other in position ‘C2’.
Step 1:
2 x 0.1µF Capacitors
into ‘C1’ & ‘C2’
Step 2 - 10k Resistor (Brown / Black / Orange): This one is part of the auto-
reset function too. Bend it over as shown, and install it to position ‘R1’.
Step 3 - 470 ohm Resistor (Yellow / Purple / Brown): This is the current-
limiting resistor for the Pin-13 LED. Bend it like the other resistor, and
install it to position ‘R2’.
Step 2:
10k resistor goes into
position ‘R1’
Step 3:
470 ohm resistor goes
into position ‘R2’
www.solarbotics.com
4
Ardweeny Manual v1.3