
Documentation
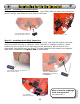


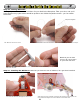

23C: Slide the spacer tube over the sensors into
the sensor hole.
23D: Bottom view of spacer tube
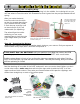
23E: Arrange the sensors so
they stick straight out the
side of Herbie
23F: Solder the ends of the whiskers to the nose and
remove the spacer tube. The whiskers shouldn’t be
touching any hole edge!
Solder the whiskers
to the nose
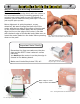
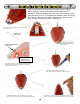
23G: Nab the forward set of whiskers
with your pliers, and give them a twist forward
23H: Bend the other side’s whiskers so it matches
the first set. Pretty snazzy Herbie the Mousebot, hmmm?
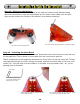
23I: TEST the sensors. Just like you did with the tail sensor,
turn it on, and bend the sensors to make sure they activate.
18
Look in your kit for a short piece of heat shrink tubing.
We’re going to use it as a spacer while soldering the
whiskers. Slide the tubing over the end of the sensors, and
into the sensor hole. This keeps the whiskers from touching
the sensor hole, which is only supposed to happen when
they hit something and make it “Backup!”
Solarbotics Herbie the Mousebot
Whiskers should
not touch the
edge of the hole!
Repeat for
other side