
Documentation


Step 17 - Testing & Mounting the Motors to
the Herbie Body:
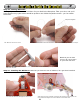
Since we’ve been messing about with the motors a
bit, let’s make sure they’re working properly. Just
connect your motor leads to your 9V battery a
moment, just to make sure they both spin. That’s it -
just a quick spin-up test.
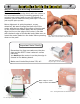
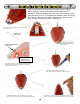
Motor alignment is quite important, so pay
attention! We want to align the black top of the
motor with the top edge of the silver mounting pad
on the inside of the Herbie body. We also want to
align the line on the edge of the motor’s flat side
with the back edge of the Herbie body. Make sure to
insert the motor leads into the holes before pressing
down on the pad!
Align edge of
motor with
edge of pad
Motor edge to match
edge of Herbie PCB
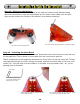
17C: The alignment for the top of the motor, and...
17D: ...the alignment for the side of the motor
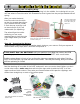
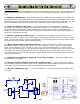
Important Note! Really!
Remember the fuss we made over the plus
sign and the DSST? Here’s where it comes
into play:
You must put the motor in so the plus sign is
closest to the battery board.
Make sure it looks like picture 17B, ok?
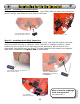
17A: Test that the motor spins by touching the
motor leads to the terminals of the 9V battery.
14
Solarbotics Herbie the Mousebot
17B: Motor installed so
the plus sign is on the inside!