
Documentation


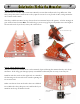


Step 9 -Installing the 4.7k Resistor (Yellow / Purple / Red):
The 4.7k resistor is part of the “Backup!” behavior circuit. It
doesn’t care which way it’s installed. It’s marked with the
stripes Yellow / Purple / Red.
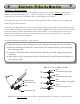
Bend the leads 90° down close to
the resistor body, so it goes into
the holes easily.
TIP: SAVE THE CLIPPINGS!
(trust us - you’ll need them)
9A: Bend the 4.7k resistor
(marked yel / pur / red)
leads 90° down
9B: Install the resistor into position “R1”
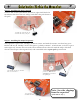
Step 10 - Transistor Installation:
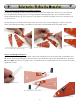
The transistor works with the resistor as part of the “Backup!” behavior. First take the transistor and
bend the flat face down forward 90°. We need to do this so it will sit flat-face down to the circuit board.
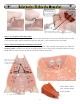
It needs to be soldered in face-down in position Q1 so it sits very flat, to leave space for the battery .
10A: Fold the transistor,
flat-face forward 90°
10B: Install in position Q1
10C: Transistor installed
Don’t mix this
one up with the
R2 resistor!
7
Solarbotics Herbie the Mousebot