
Documentation


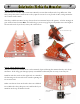


Step 7 - The Backup Relay:
This was one of our little improvements to Randy’s circuit that really made a big difference. This
relay swaps the motor connections so they spin in reverse for a set period of time, and gets Herbie
out of most traffic snarls.
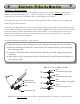
The relay could be mounted on top, but we don’t recommend it (see the picture - it looks strange). It
gets soldered into location RE1, and will only go in one way (goof-proof!). Make it nice and tight to
the circuit board. If you don’t, it may rub on the floor!
7A: Relay Installation
7B: Don’t install it on top!
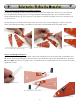
7C: Installed, nice and flat
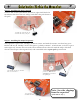
Step 8 - The 8-Pin IC Socket:
Why do we make you install the IC socket instead of just soldering the LM386 directly? It’s cheap
insurance. If the chip gets damages (rare) or installed backwards (not so rare), it’s an easy fix.
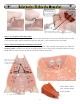
Install it with the notch on the right side so it matches
the drawing on the circuit board. It makes putting the
IC in easier later.
Make sure this is done on the side where it is labeled
IC1! Unlike the relay, this part won’t still work if you
install it on the top of Herbie’s head!
8A: Install 8-Pin
IC carrier
Note notch
position
6
Solarbotics Herbie the Mousebot