
Documentation


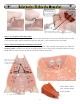


4B: GAAAH! Misaligned! 4C: See? Align edge-to-edge!
Whaa?!? See? The
half-circles here are
OUT OF ALIGNMENT!
(yes, we had to fix this
assembly error)
4D: Remelt the Solder to join the
sides. Note how the battery connector is facing backwards.
Battery clips
face rearward!
Remelt solder
to join boards
Step 5 - Do it again for the other side!:
No pictures here - just repeat the process for the other side board. You are sure that the battery board
is in correctly, right? Just to remind you (for the 3rd time...), the connectors face rearward!
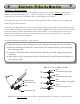
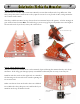
Step 6 - Finish Soldering the remaining connections:
All these half-circle pads are not just for looks and support - they actually carry signals too. There are
12 more points to solder for a total of 16 solder points. You’ve done four so far (front and rear on two
PCB). Don’t be scared to use a generous amount of solder doing this.
These two pads need
LOTS of solder as they
bridge to the battery board
as well as the side and top
1
2
3
6
5
8
7
9
10
4
11
12
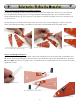
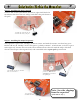
There! This is what
your Herbie should
now look like!
6A: 10 of the last 12 solder points
6B: The last 2 of the 12 solder points
5
Solarbotics Herbie the Mousebot