
Documentation


Add solder to
these pads
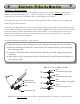
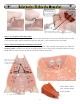
3A: Pre-tinning the
assembly pads
3B: This is how much
solder you should use
on each pad
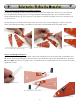
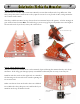
4A: Using masking tape to
align the boards before soldering
4
Step 3 - Preparing the Main Solder Pads:
We’re going to pre-tin 8 pads on the PCBs so all we have to do is align them and reheat to make them
stick. Make sure you melt a generous amount of solder on these pads, like shown in figure 3B.
Solarbotics Herbie the Mousebot
Step 4 - Assembling the Main board, one Side board, and Battery Board:
This part can get tricky, so we suggest bringing out your secret weapon: Masking tape! Yes, this stuff
should be in every good roboticist’s toolbox (right next to the Oreo cookies). Unless you have a 3rd
arm growing out of your chest, use the tape to keep things aligned. Or if you can bribe somebody to
help (use the Oreos...).
Now, review this whole step before starting it. And look at the pictures
- they make everything clear.
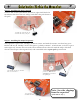
You have to make sure you get the two following alignments right:
1) Align the long edge of the two big circuit boards so they sit
edge-to-edge, with no overlapping. This is easy to do while
they are taped together.
2) Align the little half-circles on the two big circuit boards
so they match and make up one full circle.
When the boards are aligned, remelt the solder on the
front pads first, then the rear pads. Add more solder if
needed. We do the front pads first to make absolutely sure
the nose is aligned to take the nose bead later. Double
check to see that the half-circles are still aligned. If they aren’t, fix it now - it’s that important!
For the moment, use the battery board to just line up the all the three sides of the Herbie body. But
remember to put the battery board in so the connectors face to the rear. (Continued next page)