
Documentation


Herbie Enhancement: The Herbie the Mousebot Tail-Light!:
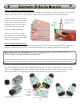
We thought that it would be fun to add “play with me” functionality to the Solarbotics Herbie the
Mousebot. What we did is add a location for an Infrared Light Emitting Diode, which is like a regular
LED, but shines IR light, which Herbie’s eyes are tuned for. By shining this light from Herbie’s rear, it
shows other Herbies where it is (”Come and get me! Nyah, nyah...”). Don’t install the IR LED unless
if you plan on having another Herbie play with it, as it does draw some power, and will shorten your
battery life.
If we put the IR LED on the nose, all you would have are Herbies bashing their heads together. So
unless if you want to play “Herbie Tackle Football” put the LED in so it points slightly downward
from the Herbie’s rear. By shining the light downward, it makes a large IR light “pool” that is very
easy for other Herbies to see.
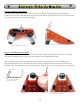
Installing the tail-light is pretty easy. Install the 150 ohm resistor (marked Brown / Green / Brown) in
location “R2”, then bend the IR LED over 90° as shown below, and install it in location “LED”. That’s
it!
Now turn off most of the lights in your room, turn on your new “Tail-Light Herbie” and another
regular Herbie, and see if “Standard” Herbie sees the light shining out from TL Herbie. The IR LED
should have the same effect as the flashlight did when you first tested your Herbie - shining it in one
eye should make one motor spin much faster than the other.
And when you’re done playing with your herd of Herbies, shine a bright light down to the floor, and
wait for them to come to you!
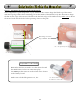
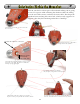
Bend the leads of the LED over 90°.
Note where the flat side of the LED is,
as it won’t work installed backwards!
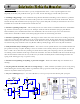
Install the Resistor (Brn / Grn / Brn) and LED
at their spots on the PCB
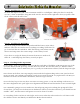
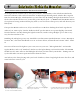
Completed IR Enhancement installation.
Again, note where the flat side of the IR LED is!
17
Solarbotics Herbie the Mousebot