
Documentation


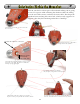


Step 19 - Installing the LM386:
No slow 286 chip for us, and a 486 or Pentium would be overkill (just a little joke there for anybody
over 30...). Time to install the chip! Just make sure the notch is on the right side when you push it into
the IC carrier, and all will be fine.
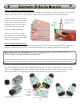
19A: Installing the LM386
Note notch position!
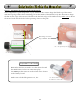
19B: Herbie brains installed
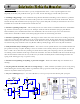
Step 20 - Installing the BATTERY!:
Yes, we’re going to take a BOLD step and install the battery. Now. Why?
Well, it’s easier for us to make sure everything is working well before we
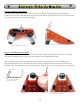
go on and add the nose whiskers. Slide the battery pack in between the
motors and snap it into the contact snaps on the battery board.
If you have to wedge the battery between the motors to make it fit,
that’s ok - it will help keep the battery securely in place.
20A: 9V battery wedge between motors
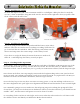
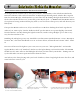
Step 21 - Checking Herbie Operation!:
Pretty simple. Turn on and HOLD onto your Herbie and shine a flashlight or IR remote into one of the
eyes. One motor should speed up, and the other slow down. Do it for the other eye. Similar results?
Good! No? Uh oh... time to make sure you’ve got all your connections soldered, and the chip is in right.
Put it down on the floor. Does it promptly run towards the brightest thing in the room (and we don’t
mean you with your radiant personality)? Good. Does it spin around in very tight circles? Oh. Bet you
installed one motor in backwards. Remember, white dots go forward!
Does it do lazy loops? You may have one motor receiving power, or one tire rubbing on the motor, or
the motor alignment isn’t quite right. Poor alignment will make it hard for Herbie to steer towards light!
Is it continually going in reverse? Make sure the tail-spring ring isn’t touching the spring tail. If this
doesn’t fix it, you may have both motors in backwards. When you hit the tail sensor, you should hear an
audible “click”, and the motors will spin in reverse for about 3 seconds.
So everything checks out fine? It seeks light, and reverses when the tail is touched? Cool. Time to add
the whisker sensors and finish your Solarbotics Herbie the Mousebot!
13
Solarbotics Herbie the Mousebot