KBS-52K085SMTY
Safety Information 02 11 Warranty 03 12 04 13 05 14 06 Connecting Smart Systems WARNING: To reduce the risk of personal injury, do not bend the blade brackets (also referred to as flanges) during assembly or after installation. Do not insert objects in the path of the blades. Warning: Kindly turn off the power when connecting cables. WARNING: To reduce the risk of fire or electric shock, this fan is NOT suitable for use with solid-state speed controls.
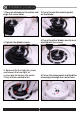
1.Place one blade on the motor and align the screw holes 2.Place the reinforcement gasket on the blade 3.Tighten the blade screws 4.Place the other blades one by one and tighten the screws 5. Remove the first light kit screw and loosen the two light kit screws pre-locked on the motor (They will be needed later.) 6.
.Tighten the 3 silver lamp panel screws 9.Insert the motor wire into the socket of the lamp panel 11.Turn the fan over 8.Loosen and remove the 3 brass light kit screws pre-locked on the lamp panel(They will be needed later) 10.Align the screw holes and tighten the 3 brass light kit screws 12.
13. Remove the lock pin and the bolt of the base of the downrod 15.Select one downrod and pass all motor wires/light cables through it 14. Remove two screws and ground wire on the hanger ball. Remove the hanger ball and bolt 16.Insert the bolt 2 holes 3 holes 17.Fix the bolt with the lock pin 18.
19.Put the decorative cover through the downrod 20.Put the canopy cover through the downrod 21.Put the canopy through the downrod 22.Put the hanger ball through the downrod 23.Insert the bolt 24.
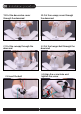
25.Insert another screw and tighten the screw 26.Install the ceiling bracket with four self tapping screws 27.Place the downrod ball into the slot in the ceiling bracket. If the slot doesn't align properly then rotate the ball 28.Loosen the screws under the ceiling bracket, you will need them later fixation slot 29.Connect the wire from the ceiling fan to the receiver( Red, White, and Black wires) 30.
31.Use wire connecting nuts to connect the three ground wires ( green) coming from the downrod, receiver and ceiling bracket 33.Put the receiver into the mounting bracket 35.Wrap keyhole slots around the screws, twist clockwise and tighten 2 screws 32.Connect the fan live wire (blac k) to your house live wire; Connect the fan neutral wire (white) to your house neutral wire 34.Lift the cannopy into place so that the screw holes are aligned 36.
37.
Connect to app settings Connect to app settings: If you power on the fan for morethan 3 minutes,you will not be able to search for the device.At this time, you need to reset your fan:turn fan power Off and back on at the wall switch, within 30 seconds,press the " " button for 5 seconds to reset. If the reset is successful,the light flashes,then add the Device again. After the reversible button is pressed, the fan slowly slows down to a stop. And then it started to reverse.
8 1.Turn on the main switch. 2. Setting the codes on the receiver: The Learn Key must be pressed with in 5 seconds,after pressing the Power button. If not,please press the Power button to restart.Keep pressing the button LEARN key in excess of 3 second it becomes a LEARN status. 3s 3. The receiver Can remember the last codes status. The ceiling fan light flash two times.
09 1 2 5 3 4
15
Within 30 seconds,press the " " button for 5 seconds to reset.
17
18
Link skill to the Amazon Echo or Google Assistant In the App, change the name of the device to an easily identifiable name such as bedroom light, bedroom fan. Make sure your Amazon Echo device is powered on and connecting to your home Wi-Fi network. Common commands Fan: Alexa, tum on/off . ● Alexa, what is the speed? ● Alexa, set the speed to 1/2/3/4/5/6. ● Alexa, setthe bedroom speed to max. △ ● Fan and light must be named separately.