
User`s guide


5. Repairing or Removing BitDefender
If you want to repair or remove BitDefender Antivirus 2010, follow the path from
the Windows start menu: Start → Programs → BitDefender 2010 → Repair or
Remove.
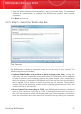
You will be requested to confirm your choice by clicking Next. A new window will
appear where you can select:
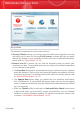
⚫ Repair - to re-install all program components installed by the previous setup.
If you choose to repair BitDefender, a new window will appear. Click Repair to
start the repairing process.
Restart the computer when prompted and, afterwards, click Install to reinstall
BitDefender Antivirus 2010.
Once the installation process is completed, a new window will appear. Click Finish.
⚫ Remove - to remove all installed components.
Note
We recommend that you choose Remove for a clean re-installation.
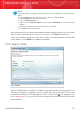
If you choose to remove BitDefender, a new window will appear.
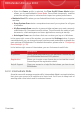
Important
Windows Vista only! By removing BitDefender, you will no longer be protected
against malware threats, such as viruses and spyware. If you want Windows
Defender to be enabled after uninstalling BitDefender, select the corresponding
check box.
Click Remove to start the removal of BitDefender Antivirus 2010 from your
computer.
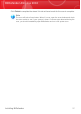
During the removal process you will be prompted to give us your feedback. Please
click OK to take an online survey consisting of no more than five short questions.
If you do not want to take the survey, just click Cancel.
Once the removal process is completed, a new window will appear. Click Finish.
Note
After the removal process is over, we recommend that you delete the
BitDefender folder from Program Files.
Repairing or Removing BitDefender
19
BitDefender Antivirus 2010