
SG.IN.AN_Operating_instructions


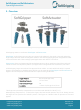
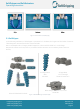
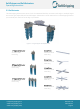
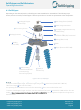
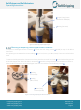
Table Of Contents

SoftGripper and SoftActuators
Operating Instructions
info@soft-gripping.com Revision 2.0
www.soft-gripping.com
2022-01-21
www.soft-gripping.shop Page 8
6.1. SoftGripper
Depending on the selected product, a SoftGripper comes assembled or unassembled. The following steps
shows you how to install your SoftGripper. These steps are also to be used for replacement of the components.
Mounting or Replacing a SoftGripper Finger
To replace a SoftGripper Finger, loosen the finger fixing screw D on the base (M3x20 ISO 7380 TX).
Take a new Finger G (Part No. SG.FI.S60).
For replacing we recommend to use a new 3x1 mm sealing J. The screw can be further used.
To mount a SoftGripper Finger at a base, use the truss head (TX) screw D M3x20 ISO 7380 and the 3x1 mm
sealing
J. Use a torque screwdriver to mount with 0.7 Nm (0.5 lbf⋅ft). The sealing has to be placed in the groove at
the base before.
I
Robot Fixing Screws
G
Finger (Part No. SG.FI.S60)
F
Base
E
Sealing (28x1,5 mm)
D
Finger Fixing Screw
M3x20 ISO 7380 (TX) Truss Head
C
Air Supply Fingers/Suction Cup
For 6mm tubing
B
Robot Flange Connector
A
Base Fixing Screws (M5x8)
H
Air Supply Fingers
/Suction Cup
J
Sealing (3x1 mm)
K
Sealing
(5x1,5 mm)
L
Optional
Suction Cup
M
M5 Mounting
Thread for additional
accessories (e.g.
Suction Cup, Spacer)
Figure 5: Parts of a SoftGripper