
Owner's manual

19
Step 3 Running the Measurement
Click the button to launch the measurement process. The noise will begin and the
average number should increase periodically.
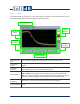
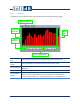
You can follow the measurement process by displaying the Dynamic view on the Spectrum display.
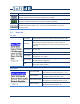
As the measurement proceeds, the dynamic should increase. Required dynamic for each
reverberation time index are showed in the following table:
T10
25 dB
T20
35 dB
T30
45 dB
EDT
25 dB
Once the specified dynamic has been reached for every frequency band and global, the reached TX
indicator should light up.
Step 4 Stopping the Measurement
The measurement stops when the TX specified in the auto-stop setting has been reached.
The user can stop the measurement process any time by clicking the button.
Step 5 Saving the Measurement
The measurement is saved by clicking the button. Once complete, the current file
indicator will display the current file name.
7.3 Manual Interrupted Noise
This method evaluates the reverberation time by analysing the noise level time decay occurring after
a noise interruption. The noise interruptions are manually generated using an external noise
generator.
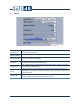
Step 1 Software Set-Up
1) Click the button on the menu bar to access the setup interface.
2) Select channel 1, ICP input and ±1,5V on the Input Setup
3) Select Manual Interrupted on the Measure mode drop down list.
4) Select the number of Averages you want to perform.