
- Ethernet Blaster Communications Cable User Guide

Altera Corporation 1–11
December 2004 EthernetBlaster Communications Cable User Guide
About the EthernetBlaster Communications Cable
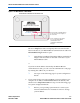
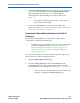
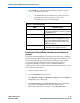
7. In the EthernetBlaster login window, enter admin as the login and
password as the default password. The EthernetBlaster Status
page opens displaying the status of your EthernetBlaster
communications cable including the current IP address. See
Figure 1–5.
1 See Chapter 2, “Managing Passwords,” to manage your
password after initial login.
8. To set up the EthernetBlaster communications cable in the
Quartus II software, see “Setting Up the EthernetBlaster Hardware
in the Quartus II Software” on page 1–13.
Configuring the EthernetBlaster Hardware to Use Static IP
Addressing
By default, the EthernetBlaster communications cable is factory
configured to use dynamic IP addressing.
1 Depending on your connection mode, this section assumes that
you have completed the steps in “Remote Connection via
Network Using Default Factory Settings” on page 1–5, or
“Direct Connection to a Computer Using Default Factory
Settings” on page 1–8.
To configure your cable to use static IP addressing and complete your
remote connection, follow the directions below:
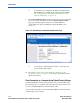
1. Open the EthernetBlaster Status page.
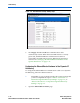
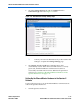
2. Click the Change Settings tab and select Static IP from the
Connection Type menu. Enter the desired IP address and other
appropriate data in the settings fields. See Figure 1–8 on page 1–12.
1 Contact your network administrator if you do not know the
settings to complete the Change Settings page.