Cordless Serial Adapter with Bluetooth® Wireless Technology Instant cable-free serial connection for devices with an RS-232 serial port User’s Guide
July 2005 Document # 6410-00207 C Copyright Notice Copyright © 2005 Socket Communications, Inc. All rights reserved. Socket, the Socket logo and Battery Friendly are registered trademarks of Socket Communications, Inc. Cordless Serial Adapter with Bluetooth Wireless Technology is a trademark of Socket Communications, Inc. The Bluetooth word mark and logo are owned by the Bluetooth SIG, Inc., and any use of such marks by Socket Communications, Inc. is under license.
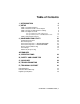
Table of Contents 1 | INTRODUCTION 4 2 | SETUP 6 STEP 1: Install the Software STEP 2: Attach the CSA to the Computer STEP 3: Prepare Communications Settings STEP 4: Configure the CSA Set up a CSA pair for cable replacement. Set up a CSA as passive serial Bluetooth receiver.
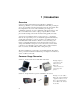
1 | Introduction Overview Socket’s Cordless Serial Adapter (CSA) with Bluetooth Wireless Technology eliminates your conventional RS-232 serial cable, providing an easy-to-use, invisible connection with superior freedom of movement. This tiny adapter allows any device with a standard 9-pin serial port to communicate wirelessly. You can communicate with another CSA or other Bluetooth enabled devices such as a laptop computer, PDA or mobile phone. Take advantage of Personal Area Networking quickly and easily.
Custom versions of the CSA are available to OEMs. For more information, contact: developers@socketcom.com. Notes: • The Cordless Serial Adapter was not designed to Bluetooth enable your computer for ActiveSync. • The Cordless Serial Adapter was designed for use with industrial serial equipment only.
2 | Setup This chapter covers the setup procedure for the Cordless Serial Adapter with Bluetooth Wireless Technology. Please note that no drivers are necessary, so the only software you need to install is the CSA Configuration Utility. Setup Summary STEP 1. Install the software. STEP 2: Attach the CSA to your computer. STEP 3. Prepare communications settings. STEP 4: Configure the CSA. STEP 5: Attach CSA to device. STEP 1: Install the Software 1. Insert the Socket Cordless Serial Adapter CD. 2.
4. In the next screen, click Configuration Utility. 5. In the File Download screen, click Open. 6. Follow the instructions on your screen to install the software.
STEP 2: Attach the CSA to the Computer 1. Attach the Cordless Serial Adapter (CSA) to the serial port of the computer you just installed the software on. 2. Determine the COM port number where you just attached the CSA. • Click Start | Control Panel | System. • Click on the Hardware tab. Click on the Device Manager button. • In the list, click on Ports. The Communications Port should be listed with its COM number. 3. Use the AC adapter to connect the CSA to a power outlet.
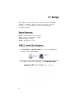
STEP 4: Configure the CSA Socket’s Cordless Serial Adapter Configuration Utility lets you reprogram the default settings on the CSA for Bluetooth. You can custom configure settings to match your individual needs. Preliminary Configuration 1. Open the utility, by doing either of the following: • Click on the icon on your desktop. • Go to Start | Programs | Cordless Serial Adapter. Cordless Serial Adapter 2. The Cordless Serial Adapter Configuration Utility will appear. Click on the COM port button.
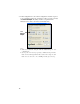
4. In the Configuration box, the current configuration should be reported as no configuration loaded. To verify that you have properly connected, click Get from adapter. The utility should now report the CSA’s firmware version, Bluetooth address and friendly name. Click Get from adapter. Note: • If this is your first time using the CSA, the utility will report “new configuration.
5. Now you are ready to enter the Device role and properties. The appropriate settings will vary depending on what device(s) you are using and how they can communicate. The following pages will include instructions for two of the most common scenarios: • Scenario 1: Set up a CSA pair as serial cable replacement. Example: Replace a printer cable with a wireless Bluetooth connection between your laptop and printer. • Scenario 2: Set up one CSA as a passive serial Bluetooth receiver.
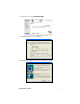
SCENARIO 1: Set up a CSA pair for cable replacement. To set up a pair of Cordless Serial Adapters as serial cable replacement, one CSA must be an acceptor, and the other an initiator (e.g., in the previous example, the printer would be acceptor, and the laptop would be initiator). ¾ Set up the Acceptor 1. In the Device role box, select Acceptor. Click Properties. Select Acceptor. Click Properties. 2. In the General screen, change the Friendly Name if desired.
3. Click on the Connections tab. Enter the following settings: • Accessibility: Select Connectable • Uncheck Only when DTR is asserted by local host • Notifications: Select Do not generate notifications Select Connectable. Uncheck. Select Do not generate notifications. 4. Click on the Security tab. Make sure all boxes are unchecked.
5. Click on the Port Settings tab. Enter the appropriate settings for your devices and applications. Do not change any default settings in the Advanced screen. Afterwards, click OK to exit the properties screens. Important! Be sure to set the baud rate to match that of the local host serial port! You must also enter the same baud rate in any third party applications used with the CSA! 6. Click Write to adapter to configure your CSA with the new settings. Click Write to adapter.
¾ Set up the Initiator 1. In the Device role box, select Initiator. Click Properties. Select Initiator. Click Properties. 2. In the General screen, change the Friendly Name if desired. For example, you may want to enter a name like “Socket CSA-Initiator.
3. Click on the Connections tab. Enter the following settings: • Accessibility: Select Connect automatically Uncheck Only when DTR is asserted by local host • Notifications: Select Do not generate notifications Select Connect automatically. Uncheck. Select Do not generate notifications. 4. Click on the Remote Target tab. In the Connect to field, enter the Bluetooth address or friendly name of the other CSA. Enter the Bluetooth address of the other CSA. 5. Click on the Security tab.
6. Click on the Port Settings tab. Enter the appropriate settings for your devices and applications. All the settings should be the same as the CSA set up as Acceptor. 7. After entering all of the properties, click OK to exit the properties screens. 8. Click Write to adapter to configure your CSA with the new settings. Unplug the CSA from your computer. Now you are ready to proceed to Step 5 to attach it to the device. Click Write to adapter.
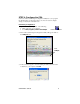
SCENARIO 2: Set up a CSA as a passive serial Bluetooth receiver. 1. In the Device role box, select Acceptor. Click Properties. Select Acceptor. 2. In the General screen, change the Friendly Name if desired. 18 Click Properties.
3. Click on the Connections tab. Enter the following settings: • Accessibility: Select Connectable and Discoverable • Uncheck Only when DTR is asserted by local host • Notifications: Select Do not generate notifications Select Connectable and Discoverable. Uncheck. Select Do not generate notifications. 4. Click on the Security tab. If the other device requires special security settings, make the appropriate selections.
5. Click on the Port Settings tab. Enter the appropriate settings for your devices and applications. Do not change any of the default settings in the Advanced screen. Afterwards, click OK to exit the properties screens. Important! Be sure to set the baud rate to match that of the local host serial port! You must also enter the same baud rate in any third party applications used with the CSA! 6. Click Write to adapter to configure your CSA with the new settings. Click Write to adapter.
STEP 5: Attach CSA to Device After configuring the CSA, now you are ready to attach it to the serial port of your target device. Assemble correct hardware to attach CSA. Depending on the type of target device you are using and what type of serial port it has, you may or may not need to use additional hardware to correctly attach and communicate via the CSA.
CSA connects either automatically or with manual initiation. Depending on how your configured the CSA, it may automatically connect with the remote device, or you may need to manually initiate a connection. In the previous scenarios, the following should happen: SCENARIO 1: Set up a CSA pair for cable replacement. After you attach the CSA to each device (with each powered on), they should automatically try to connect.
3 | Configuration Utility This chapter explains how to use Socket’s Cordless Serial Adapter Configuration Utility. Besides covering the basic configuration functions, this chapter will also explain how to use each property screen.
Configuration Functions Get from adapter: Click to read the configuration currently written to the CSA. You can read the current configuration and modify the settings if desired. Checking to see if a configuration can be read is also a good method for verifying that the CSA is properly attached and ready to have a configuration written to it. Write to adapter: Click to physically configure the CSA with the settings entered into the utility.
Replicate: Click to make a copy of the current configuration. A screen will appear for you to enter some unique settings (e.g., friendly name, security settings) for this configuration. Enter any necessary settings and click OK. This function is useful if you have multiple CSA’s and need to configure them all with the same settings. The screen varies depending on whether you are in Acceptor or Initiator mode.
General Properties The General properties page displays general device identification, device class, and service class information. This page appears for both acceptor and initiator modes. Friendly Name: If desired, enter a new name. For example, you may want the friendly name to reflect which device you plan to attach it to.
Connections Properties — ACCEPTOR MODE Accessibility • Not Connectable: Select to prevent the CSA from connecting to other devices. • Connectable: Select to allow other devices to connect to the CSA. • Connectable and Discoverable: Selected by default. • Only when DTR is asserted by the local host: Check ONLY IF you know that the local host sends DTR (Data Terminal Ready) signals. If you are not sure, uncheck the box.
Connections Properties — INITIATOR MODE When to connect • Connect automatically: Select for the CSA to connect automatically. Note: If you check Connect automatically, the CSA will need to receive a software command to initiate a connection. • Only when DTR is asserted by the local host: Check ONLY IF you know that the local host sends DTR (Data Terminal Ready) signals. If you are not sure, uncheck the box.
Notifications • Notify local host of Bluetooth events: Select ONLY IF you know your local host can accept notifications of Bluetooth events. Some devices cannot accept such notifications and will malfunction. • Do not generate notification: Select if your local host cannot accept notifications of Bluetooth events, or if you are not sure whether or not your local host can accept them. Note: Notifications may be useful if you are writing custom software for the CSA.
Remote Target (Initiator only) You have two options for identifying the remote device (the device you wish the CSA to connect to): OPTION 1: If you know the Bluetooth Address or friendly name of the remote device, simply type it in the Connect to: field. OPTION 2: If you do not know the Bluetooth Address or friendly name of the remote device, perform a device discovery: Device Discovery 1. Click on the Filter… button to select the Bluetooth device and/or service class to discover.
2. Click Discover… The utility will search for Bluetooth devices in range. 3. In the Discovered devices field, click on the Bluetooth address of the device you wish the CSA to connect to. It should appear in the Connect to: field. Note: If you do not know the Bluetooth address or friendly name of the remote device, perform the device discovery with the remote device on, then with the device off, to determine the correct Bluetooth address or friendly name.
Port Settings Select the correct port settings for your remote device. IMPORTANT! After entering all the adapter properties, click OK to exit the properties screen.
Advanced (Acceptor only) Important! It is beyond the scope of this User’s Guide to explain the effects of the Advanced settings. DO NOT adjust any of the settings in the Advanced screen unless you are an advanced user and completely understand what you are doing! IMPORTANT! After entering all the adapter properties, click OK to exit the properties screen.
Appendix A Specifications Physical Characteristics: Dimensions: 65 x 35 x 17 mm Total Mass: 25 g Serial Connector: 9 pin male DB-9, DTE Antenna: Integrated Class 2 Bluetooth module Baud Rate: Default: 19,200 bps Configurable range: 1,200-230,000 bps Environmental Conditions: Operating Temperature: -20 to +85 °C Humidity: 5% to 95% non-condensing Storage Temperature: -40 to +95 °C Serial COM Interface Standard: Asynchronous RS-232 Range: Approx.
Pin Assignments Pin # 1 2 3 4 5 6 7 8 9 Direction IN IN OUT OUT IN OUT IN Function DCD — Carrier detect RXD serial data from local host TXD serial data to local host DTR Data terminal ready Ground DSR Data set ready RTS Request to send to local host CTS Clear to send from local host Optional power input (3.3 to 5.0 Vdc) Power Mechanisms: The CSA operates from DC power and can be powered via one of two mechanisms: 1. From the Power Jack on the CSA.
Appendix B Safety and Usage Tips About Bluetooth and Health Bluetooth wireless technology allows you to use short-range radio signals to connect a variety of devices, such as mobile phones, Pocket PCs, notebook computers, printers, LAN access points, and many other devices at home or work. These radio signals replace the cables that have traditionally connected these devices. Bluetooth products have small radio transmitters and receivers. Output power is normally very low, only 1 mW (1/1000 of a watt).
• Do not use the Cordless Serial Adapter in a place with risk of strong vibration. • Do not use benzene or paint thinner to clean the Cordless Serial Adapter. Antenna Care and Efficient Use Do not surround your Cordless Serial Adapter with metal since it will reduce the radio transmission efficiency. Driving RF energy may affect some electronic systems in motor vehicles, such as car stereo, safety equipment, etc.
FCC Report and Order, ET Docket 93-62, FCC 96-326, Federal Communications Commission (FCC), August 1996. Radiocommunications (Electromagnetic Radiation Human Exposure) Standard 1999, Australian Communications Authority (ACA), May 1999.
Appendix C Glossary A, B, C Acceptor A Bluetooth enabled device that accepts an action (e.g., a connection) from another Bluetooth enabled device, known as the initiator AT command The de facto standard language for controlling modems. The AT command set was developed by Hayes and is recognized by virtually all personal computer modems Authentication Verification of identity as a security measure.
F, G, I female serial port A serial port with pinholes flow control The control of transmission between communications devices, to make sure the sender does not send data until the receiver is ready to receive it friendly name A name you can assign to a Bluetooth enabled device, e.g., “Lesley’s Computer.
devices to interoperate in serial communications, both devices must have this profile service class The type of service that a Bluetooth enabled device can provide to other Bluetooth enabled devices stop bit In serial communications, where each bit of the message is transmitted in sequence, stop bits are extra "1" bits which follow the data and any parity bit.
Appendix D Troubleshooting SYMPTOM: The Configuration Utility is not working properly (e.g., I cannot read the settings from the CSA) and/or I get an error message that says “Unable to open the COM port.” POSSIBLE REASONS SOLUTION The CSA is not attached properly to your computer. Properly insert the CSA, pushing it into your computer’s serial port as far as it will go. Use the AC adapter to connect the CSA to an electrical outlet. Remove the remote target from range. The CSA does not have power.
Appendix E Technical Support If you have trouble installing or using the Cordless Serial Adapter with Bluetooth Wireless Technology, Socket has two technical support resources to help you. Please note that technical support is available in English only. 1. Socket On-Line Support (SOS) Socket On-Line Support is an automated technical support program that interacts with you to provide the answers you need. SOS provides immediate service and is the best place to start for technical support.
Limited Warranty Socket Communications Incorporated (Socket) warrants this product against defects in material and workmanship, under normal use and service, for the following period from the date of purchase: Cordless Serial Adapter: Three years Incompatibility is not a defect covered by Socket’s warranty.
Limited Software Warranty LIMITED WARRANTY. SOCKET warrants that the original disk or CD ROM is free from defects for 90 days from the date of delivery of the SOFTWARE. CUSTOMER REMEDIES. SOCKET’S entire liability and your exclusive remedy shall be, at SOCKET’S option, either (a) return of the price paid or (b) replacement of the SOFTWARE which does not meet SOCKET’S Limited Warranty and which is returned to SOCKET with a copy of your receipt.
Regulatory Compliance The Socket Cordless Serial Adapter with Bluetooth Wireless Technology is designed to be compliant with the rules and regulations in locations where they are sold and will be labeled as required. This product is type approved — users are not required to obtain license or authorization before using. This product has been certified as conforming to technological standards.
To comply with Industry Canada RF exposure compliance requirements, the following antenna installation and device operating configurations must be satisfied: “The installer of this radio equipment must ensure that the antenna is located or pointed such that it does not emit RF field in excess of Health Canada limits for the general population; consult Safety Code 6, obtainable from Health Canada’s website: www.hc-sc.gc.ca/ehp/ehd/catalogue/rpb.
Note that the radio frequency band used by this equipment has not been harmonized in all the EU. Applicable area (nation): Austria, Belgium, Denmark, Finland, France, Germany, Greece, Iceland, Ireland, Italy, Luxembourg, Norway, Portugal, Spain, Sweden, Switzerland, The Netherlands, United Kingdom Product Disposal Your device should not be placed in municipal waste. Please check local regulations for disposal of electronic products.
© Socket Communications, Inc. 7/2005 Printed in U.S.A.